Working With User Responses
The powerful combination of a chatbot created on the SnatchBot platform and the Zapier automation service allows you to save and process the data that your chatbot has generated.
User Responses
It is very easy for the bot to utilize responses that the user has provided, for example, their name, email address, phone number, etc. You can do so in four different ways, according to your needs.
- If you simply want to use the data in a conversational way, then use a Prior Response.
For example, if your first interaction asks the user for a name:
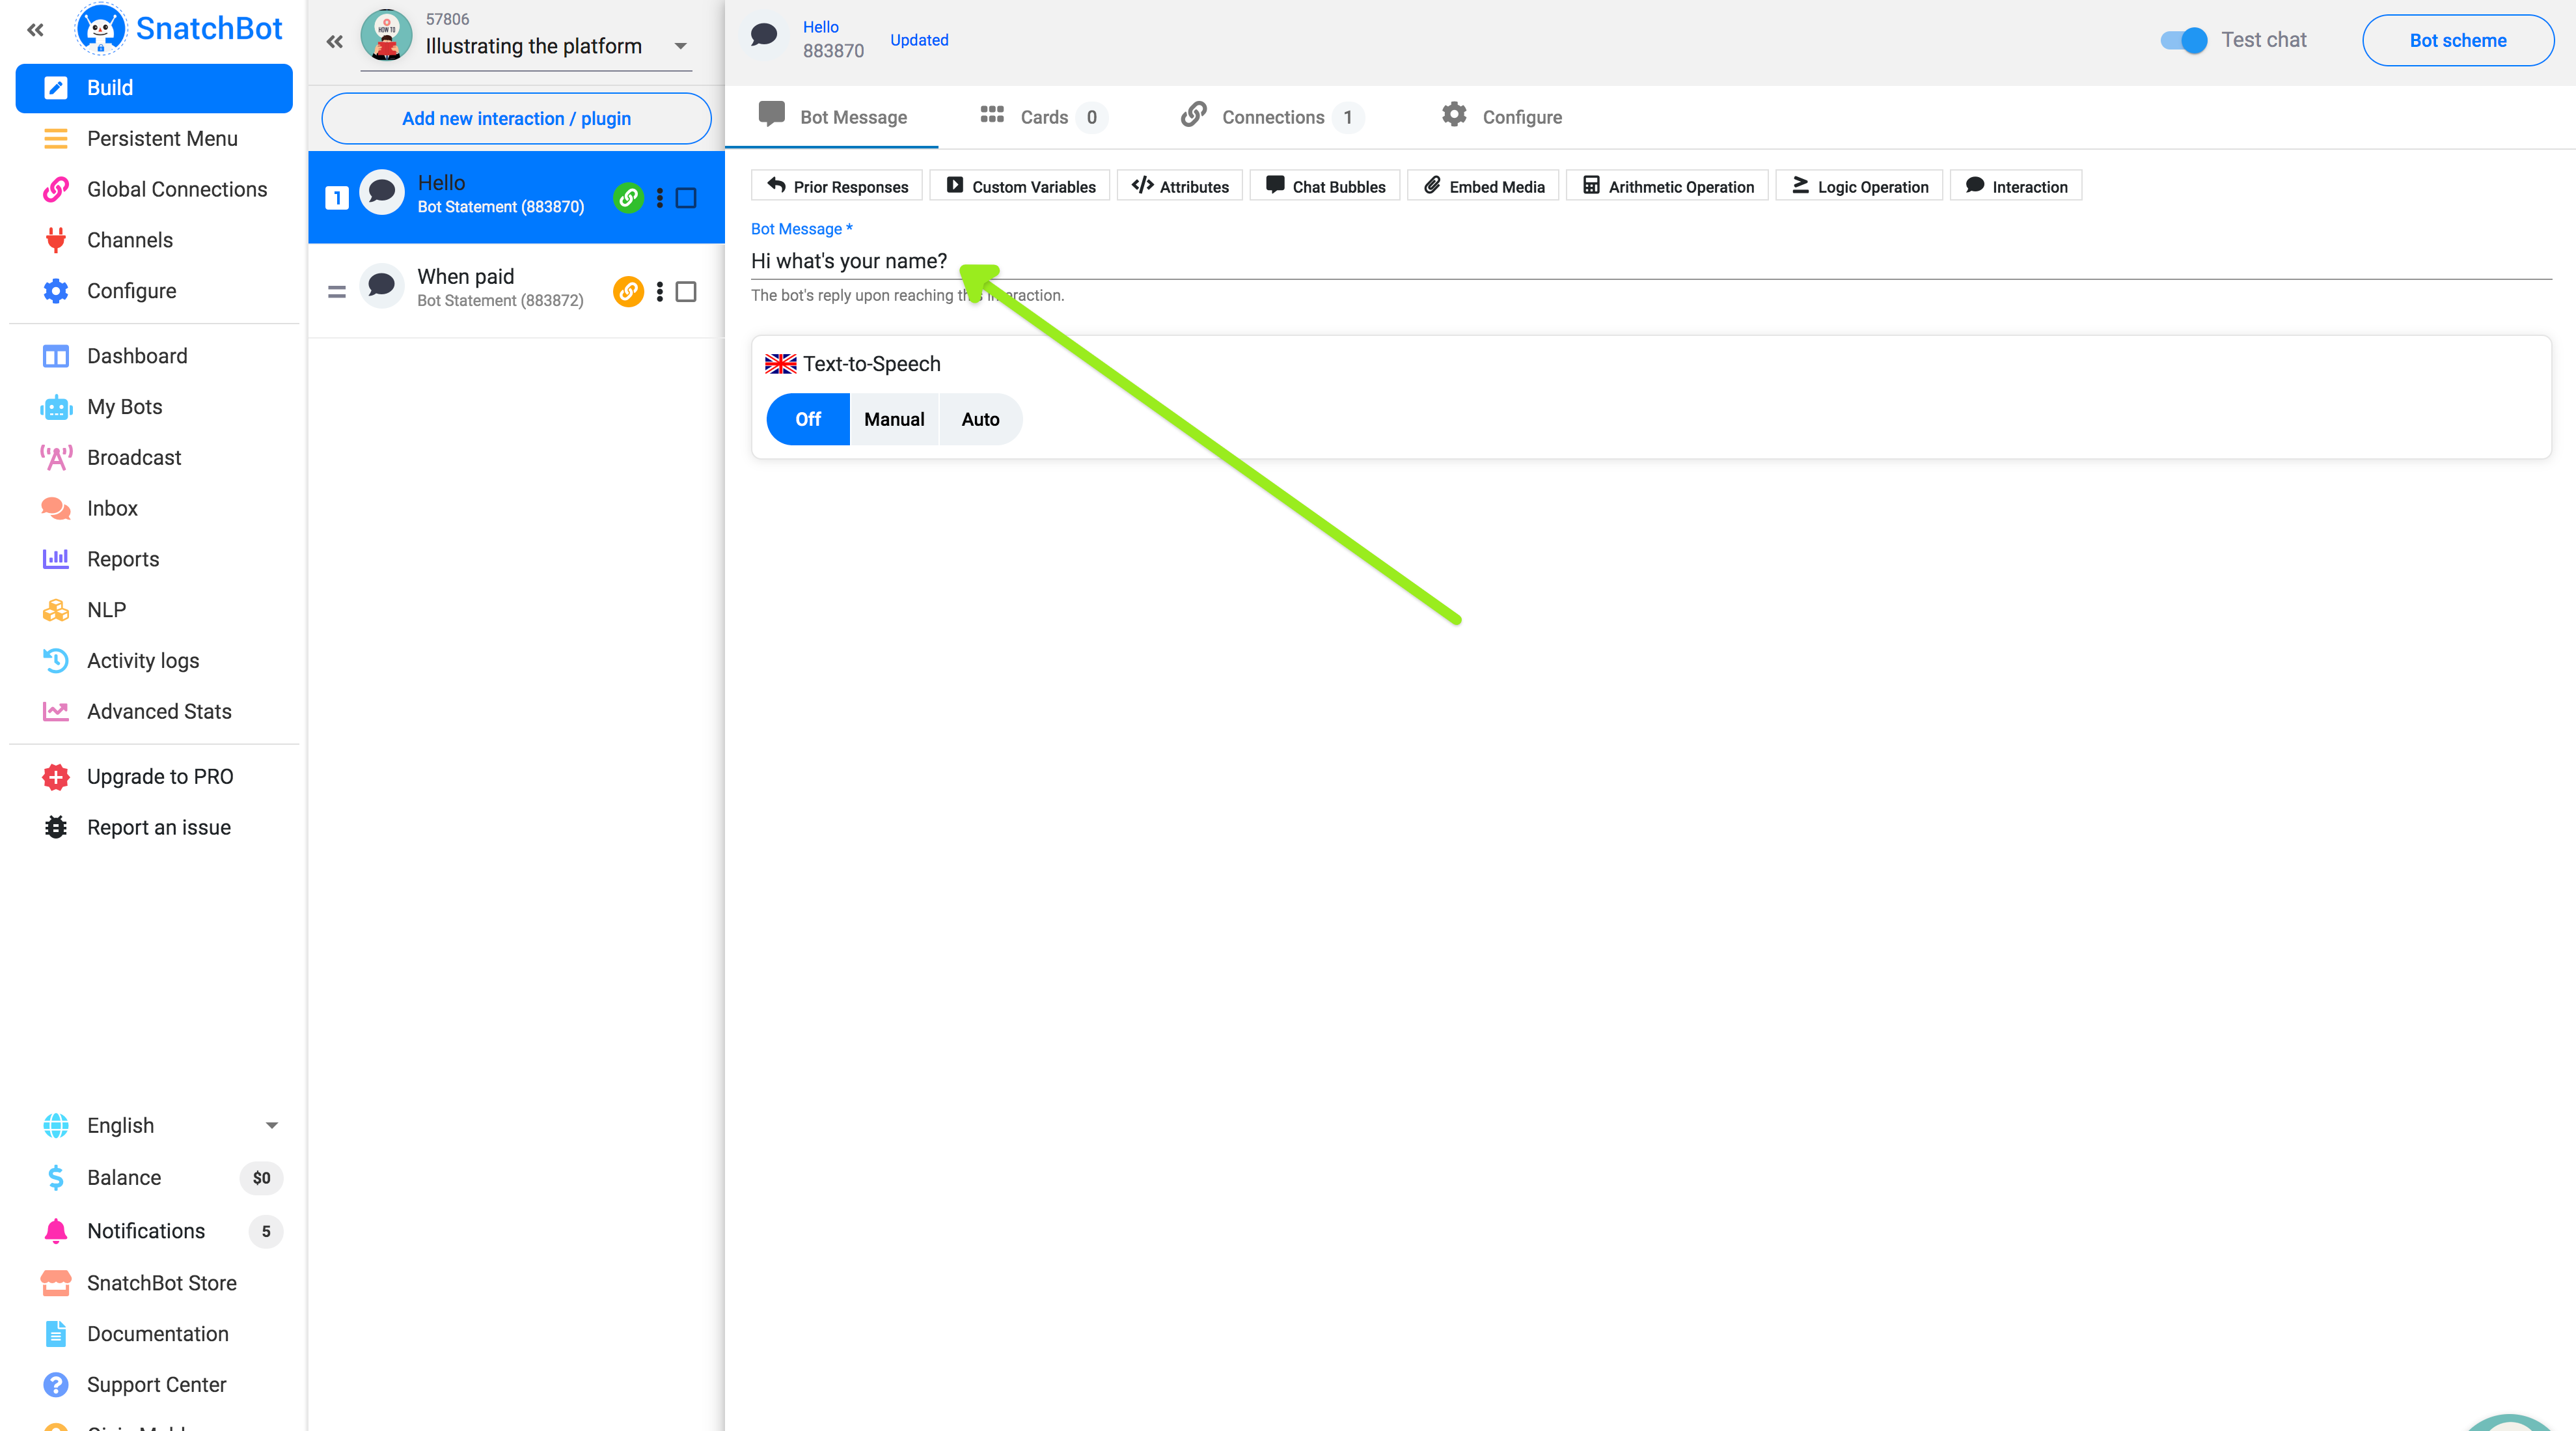
Then in your subsequent interactions, your bot can chat to the user by name.
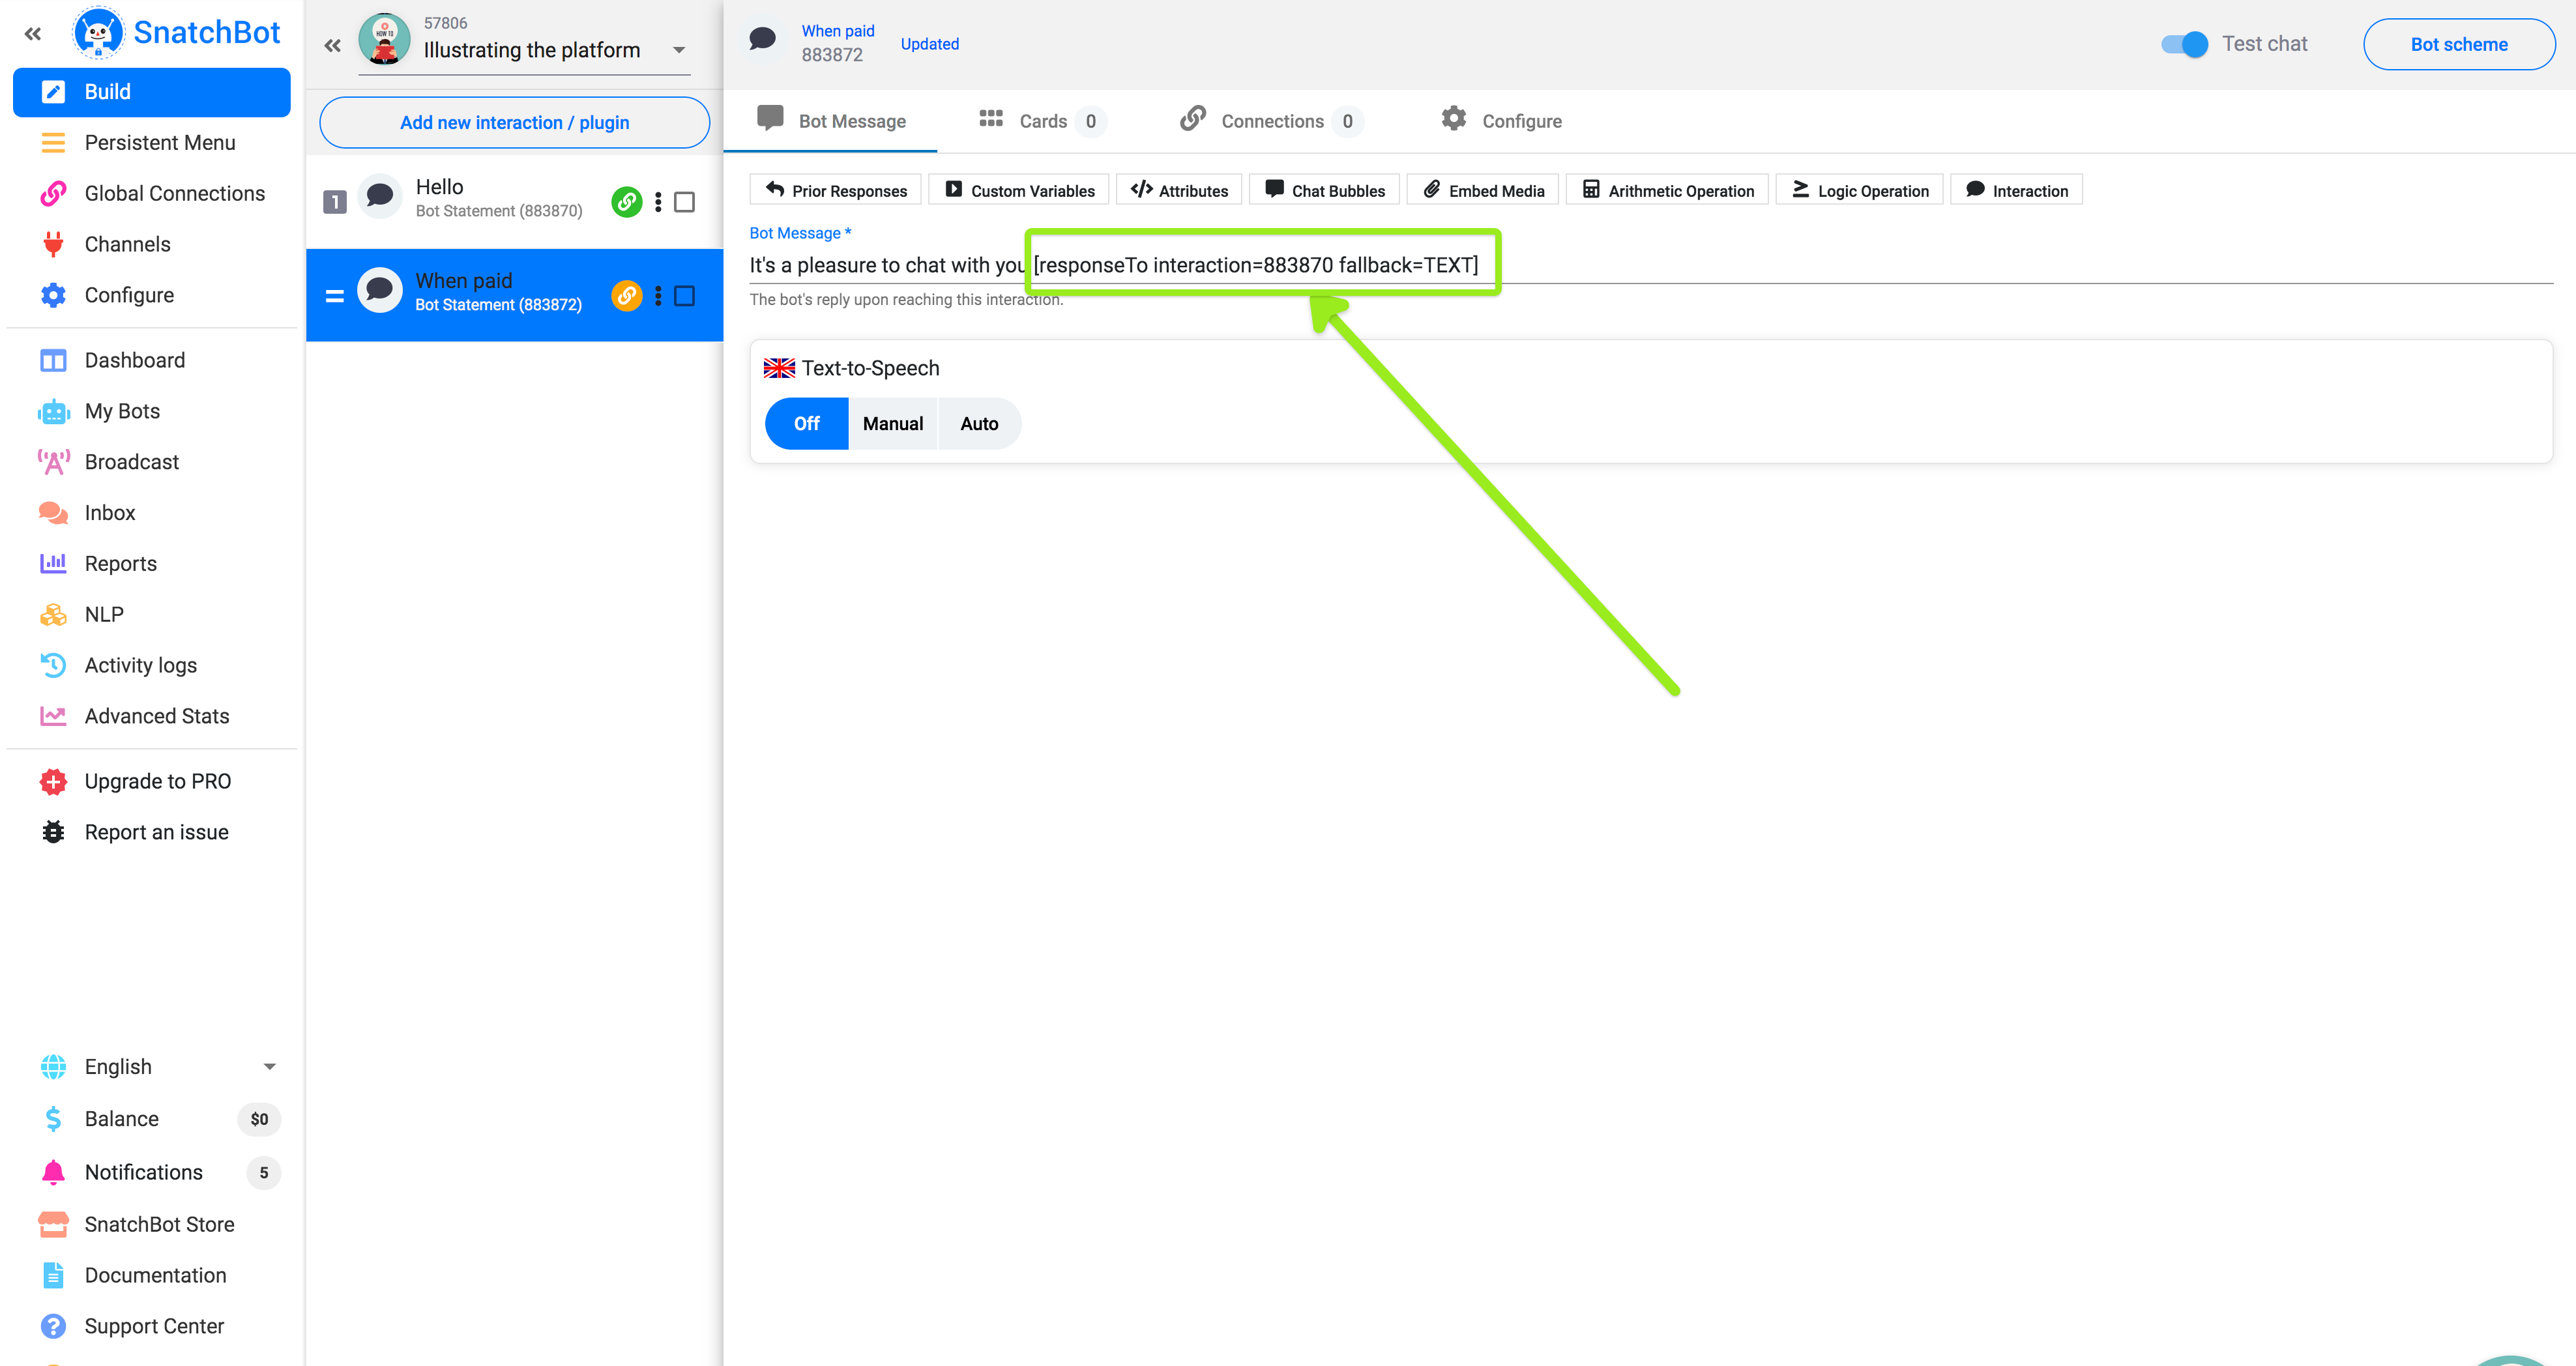
- You can use the Extracted Data command in exactly the same way. The shortcut to using this command is under Prior Responses.
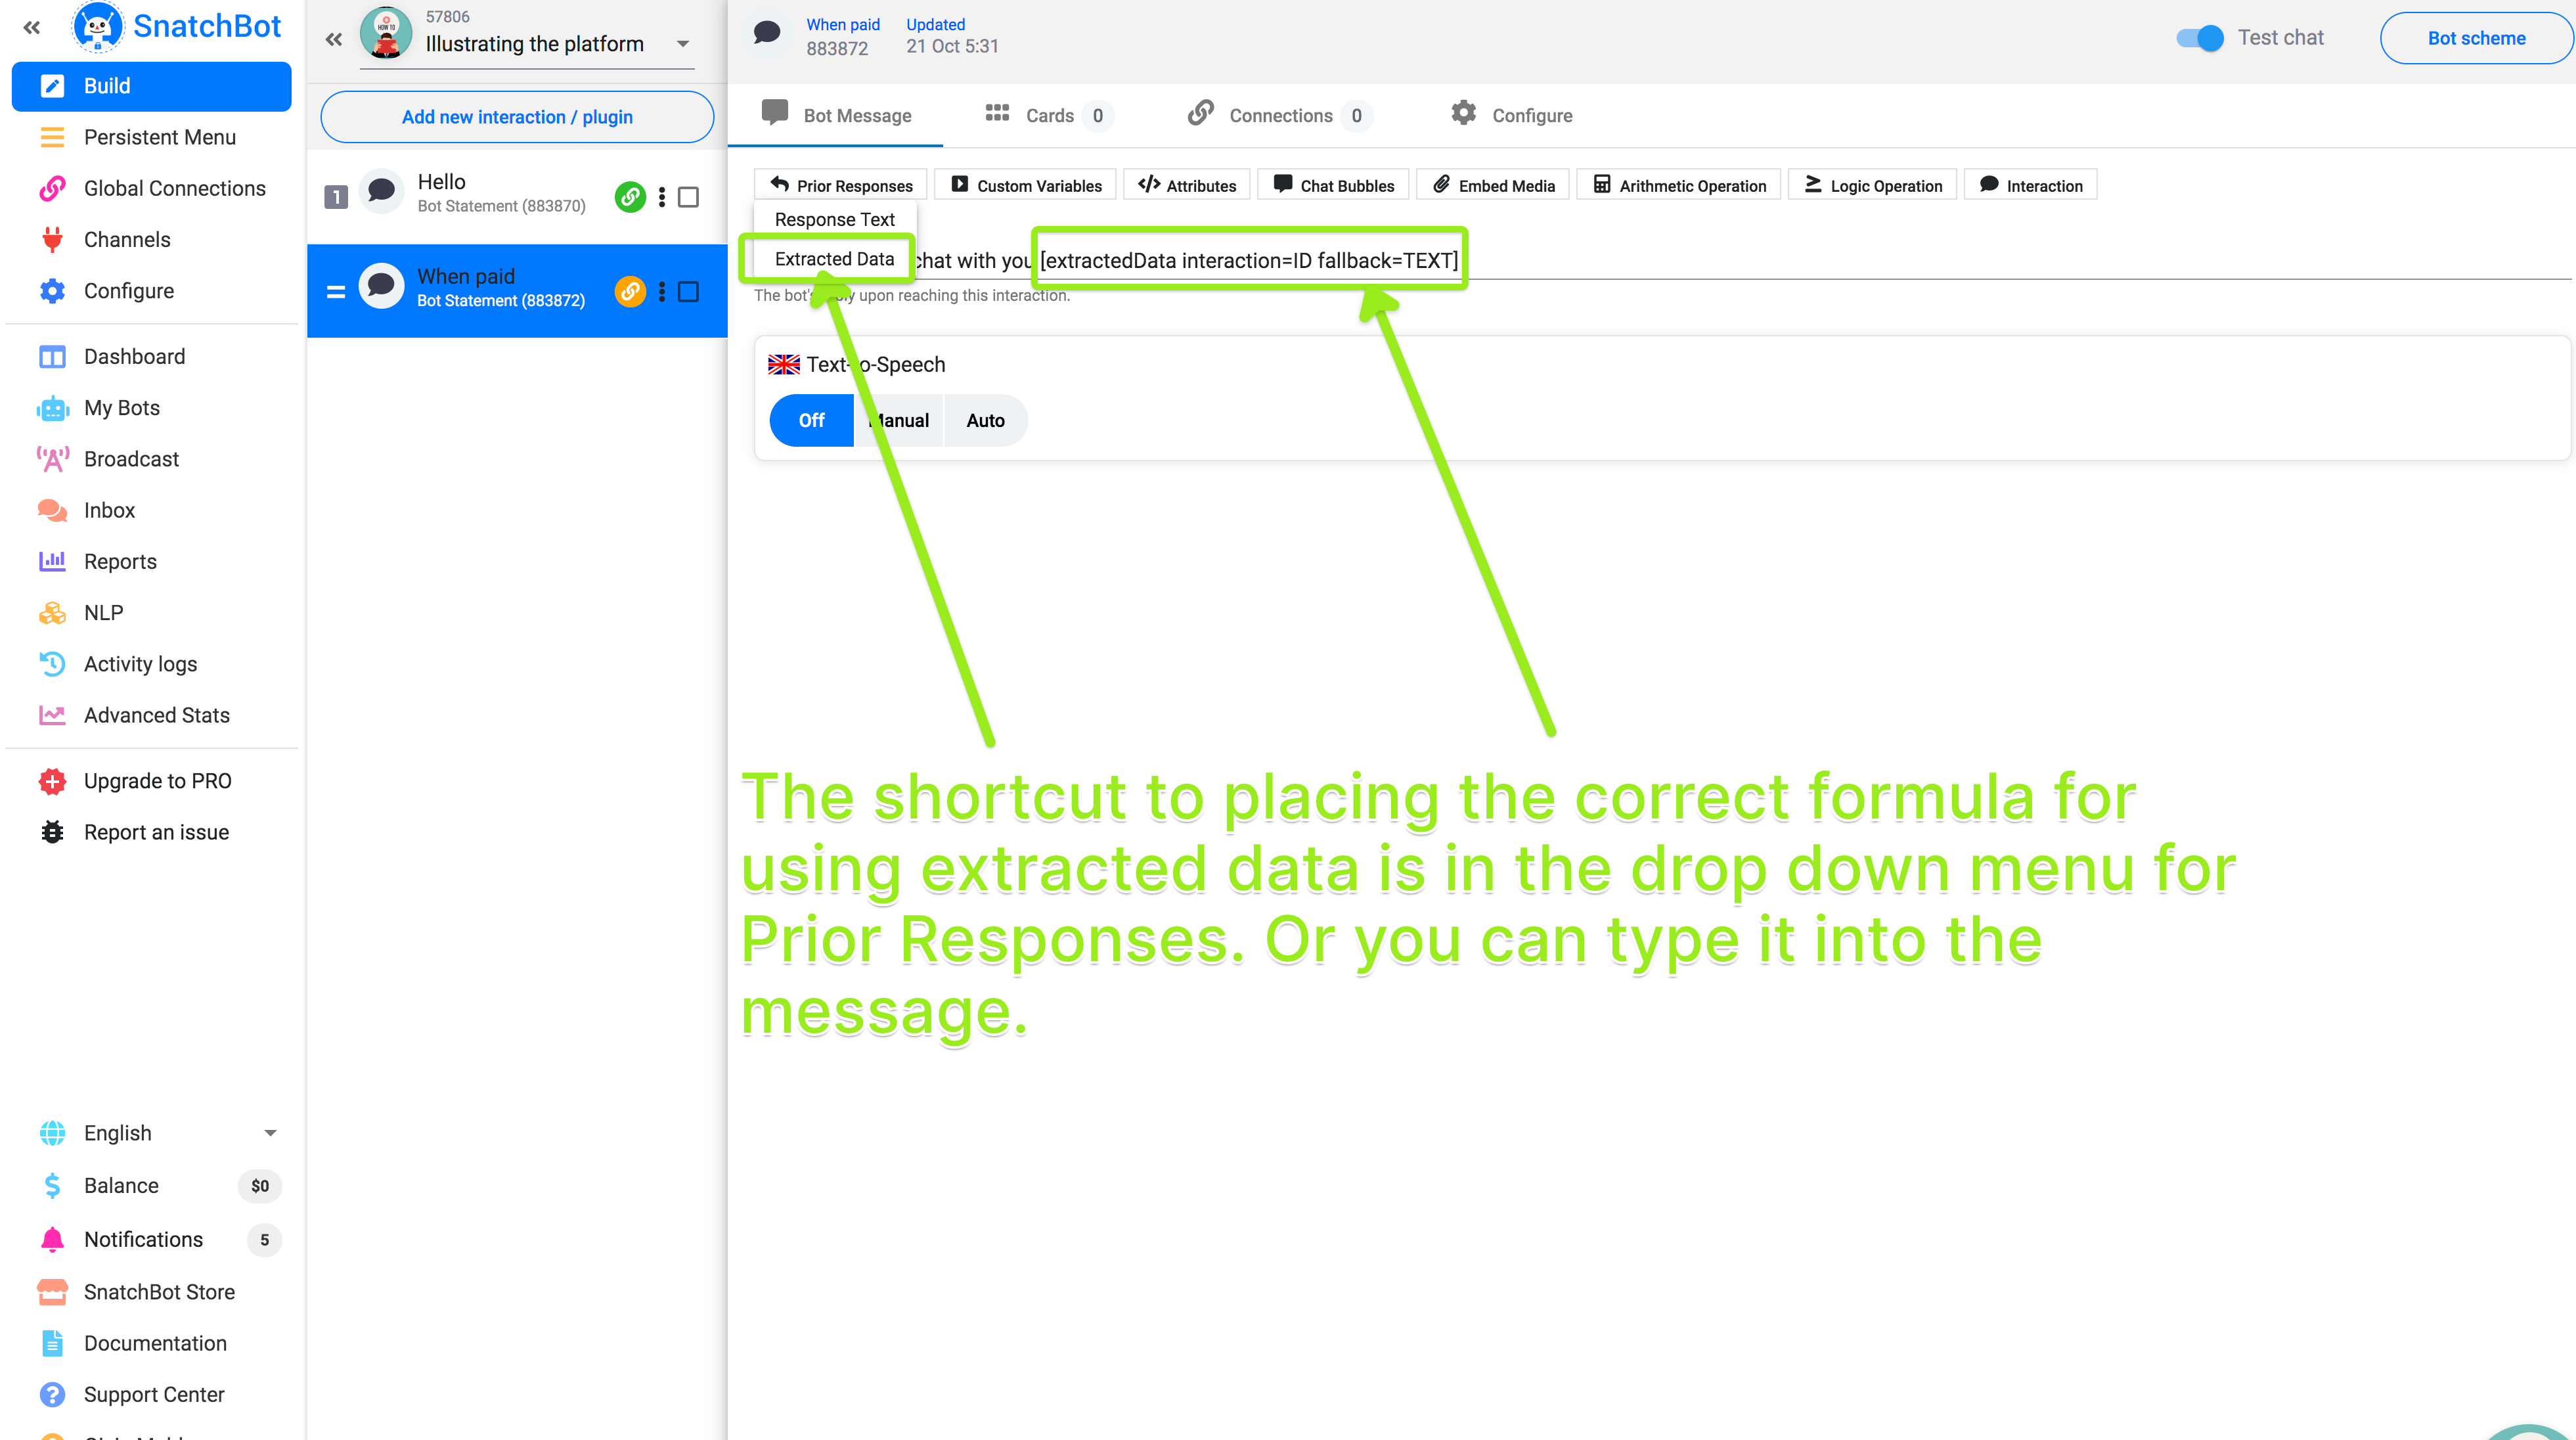
When using Prior Response or Extracted Data there is no difference to how the conversation looks to the user. The difference is in how the data is stored. Unlike with a Prior Response, if you click on the Highlight Extracted Data button (visible to you only), you will see the extracted data outlined.
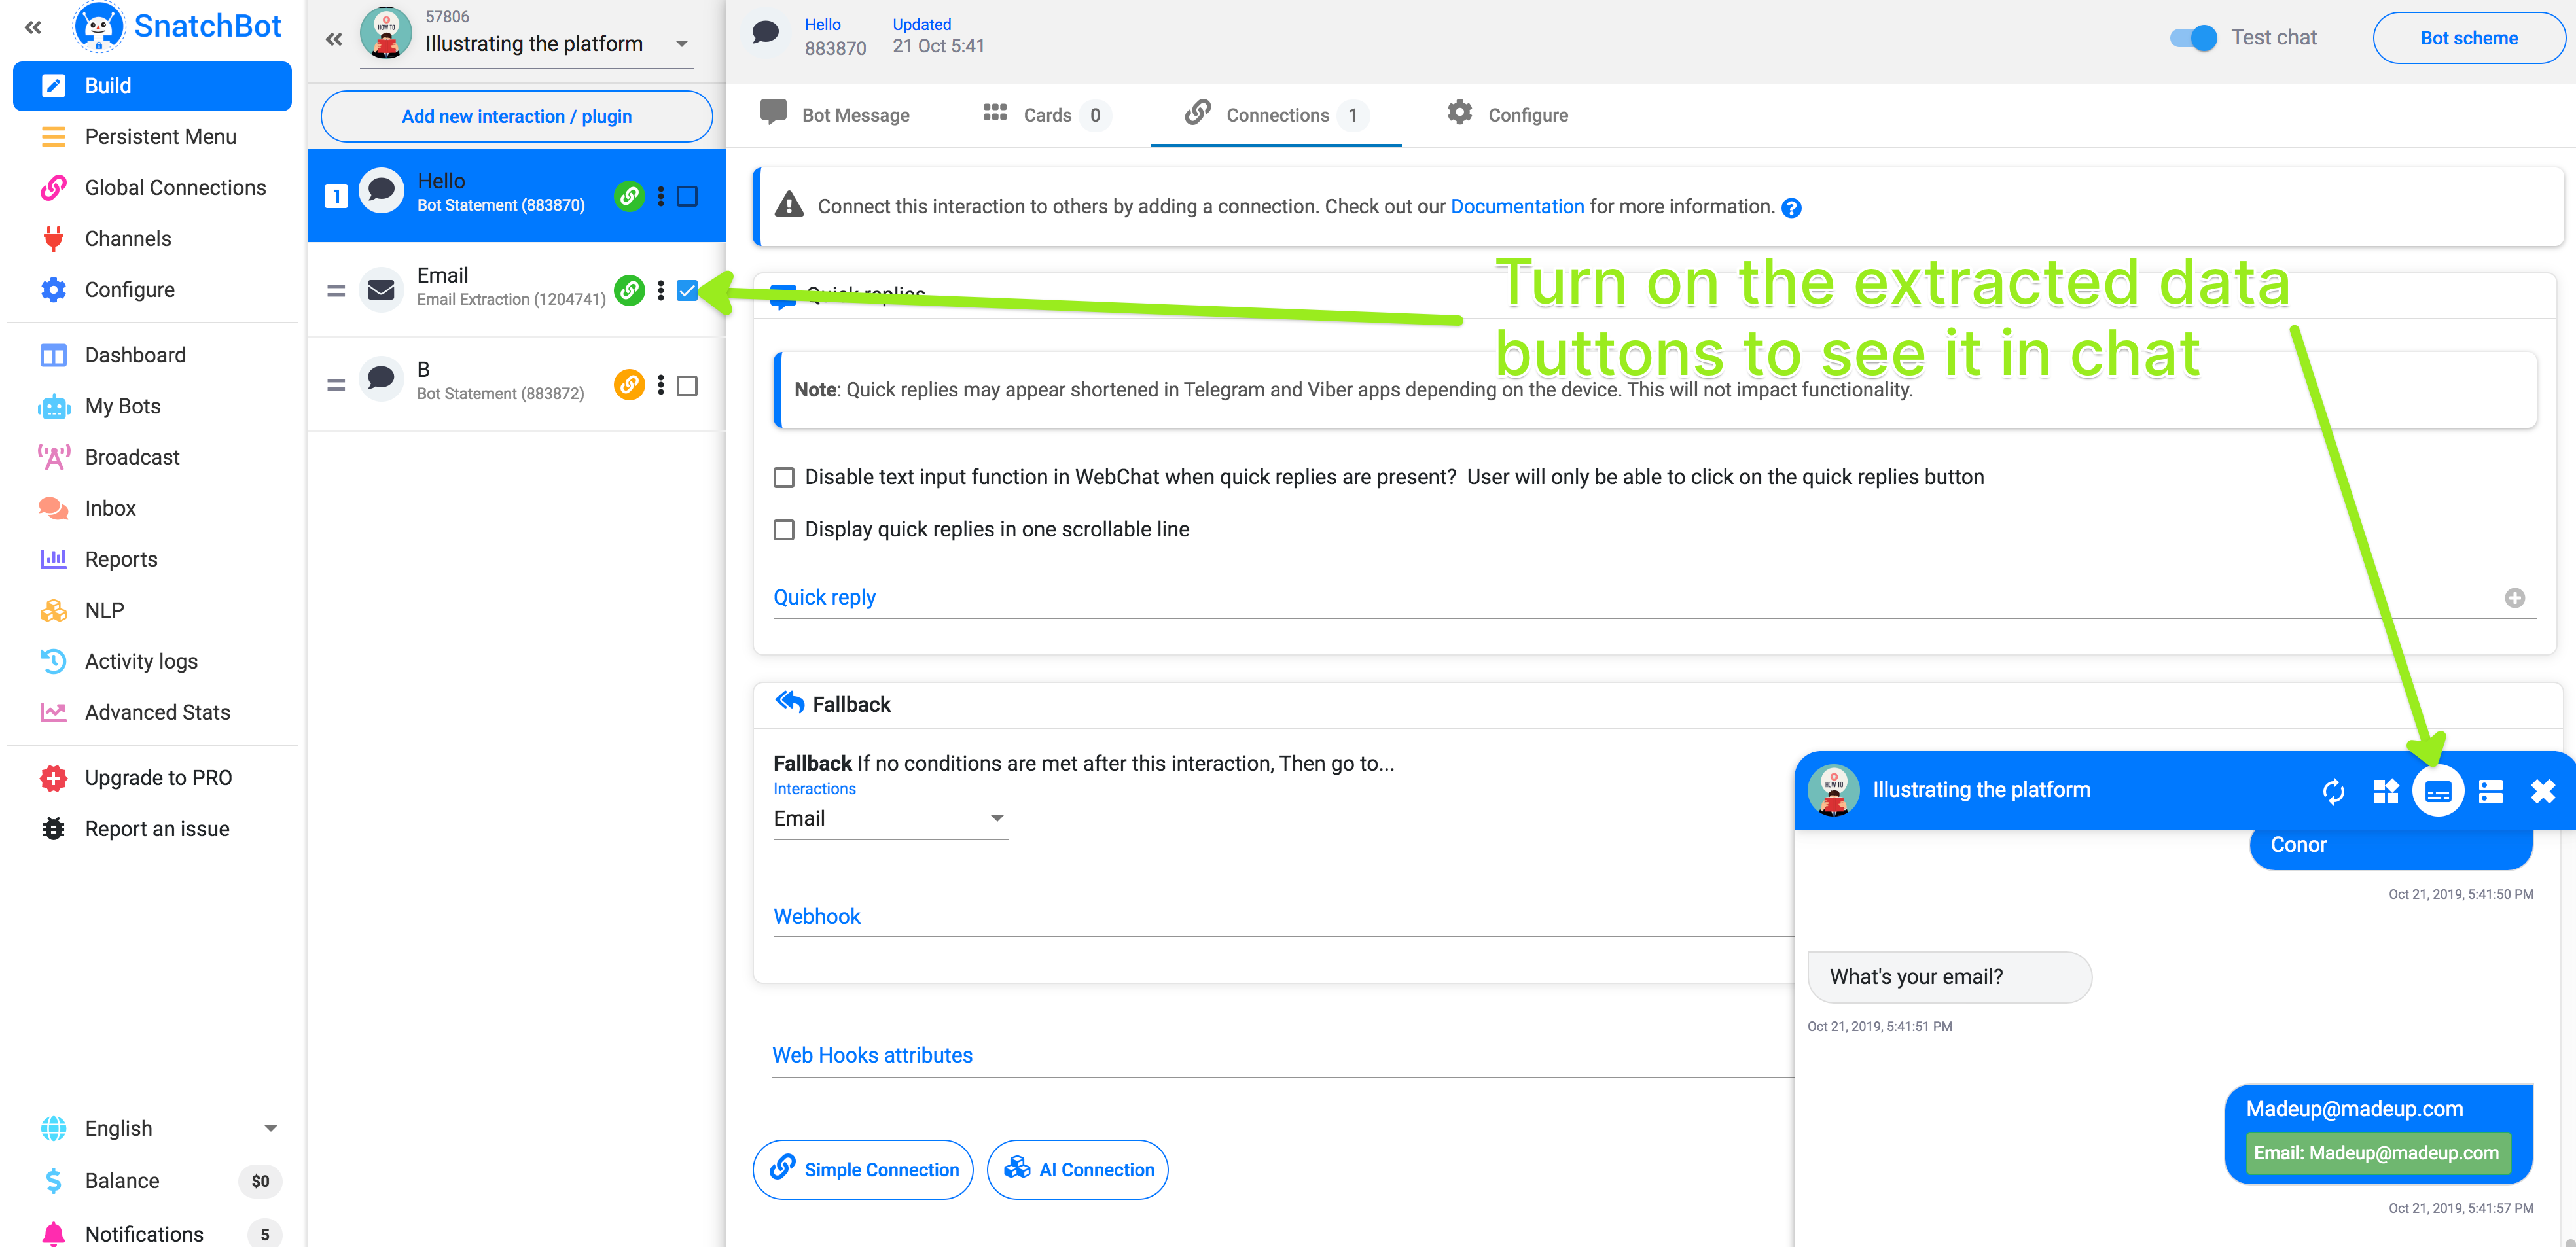
This data can then also be outlined and filtered for you in Reports.

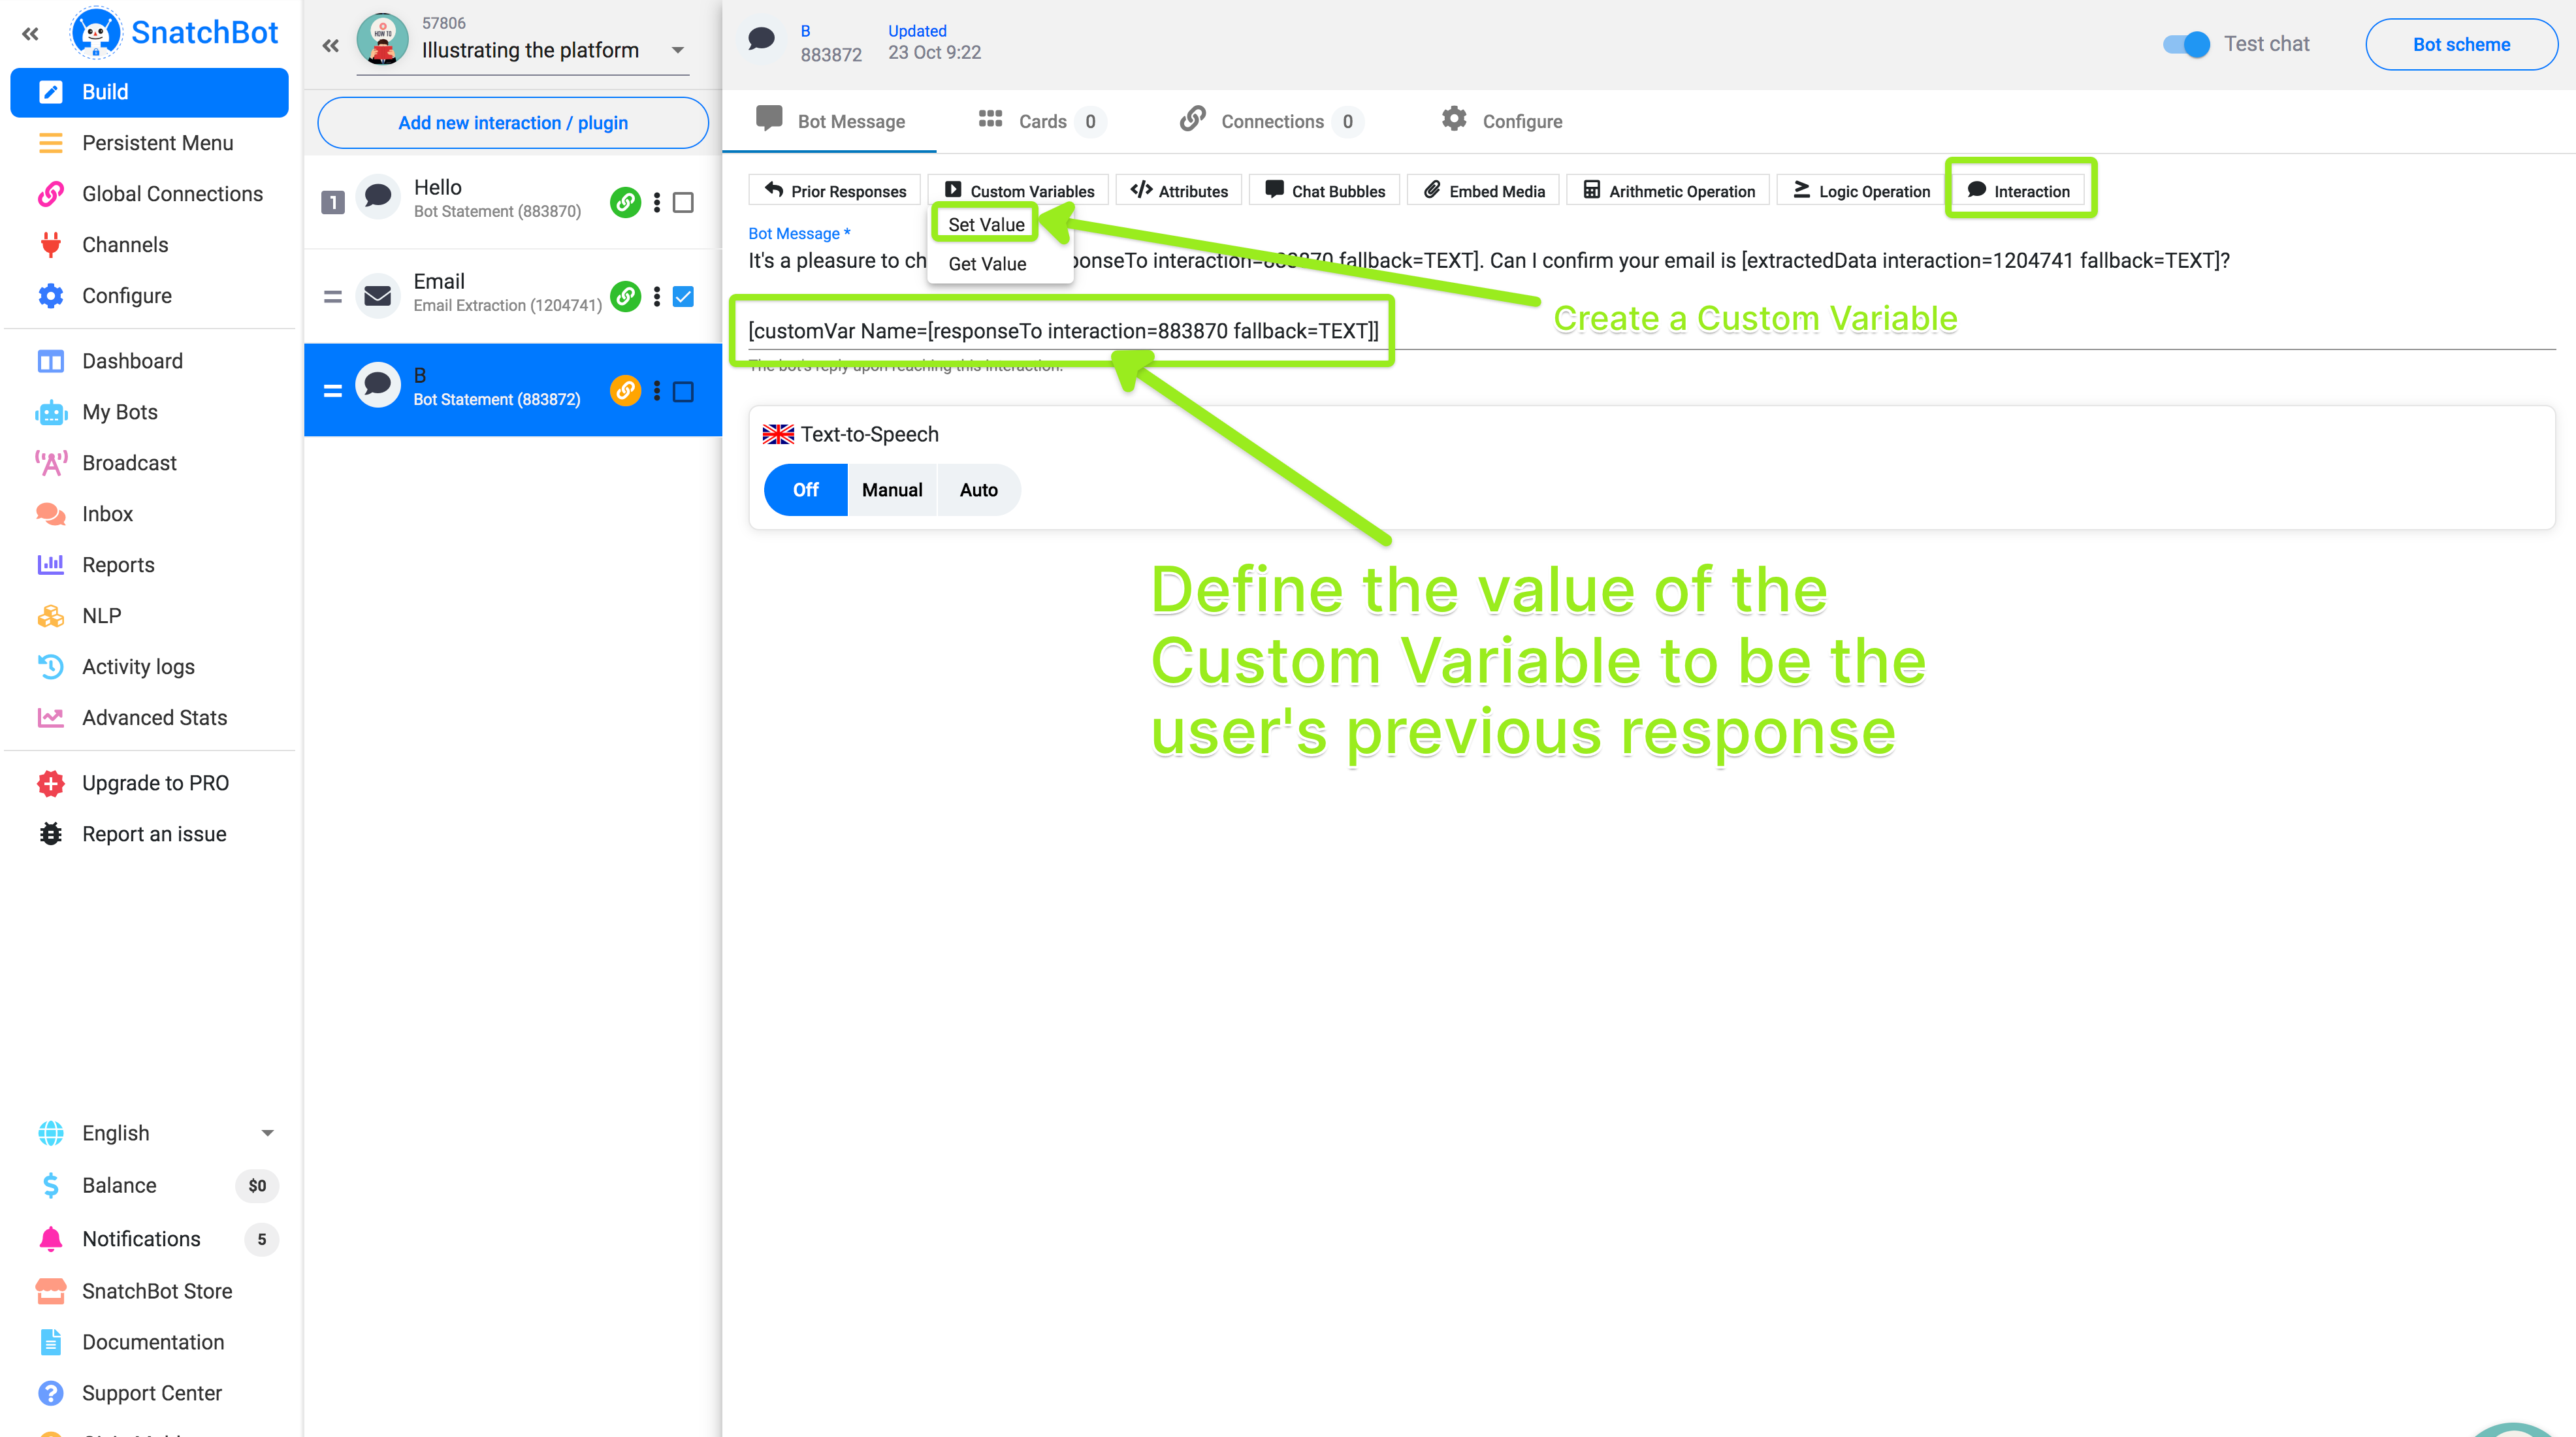
- You can put the user entry into the form of a Custom Variable. This is particularly useful if the entry is a number, which you can then perform calculations with, using the arithmetic functions we provide.
You define the Custom Variable in the form [customVar KEY=VALUE] so if you wanted to insert the user’s name as that value, you would combine Custom Variable with a prior response or extracted data like this:
[customVar Name=[responseTo interaction=883870 fallback=TEXT]]
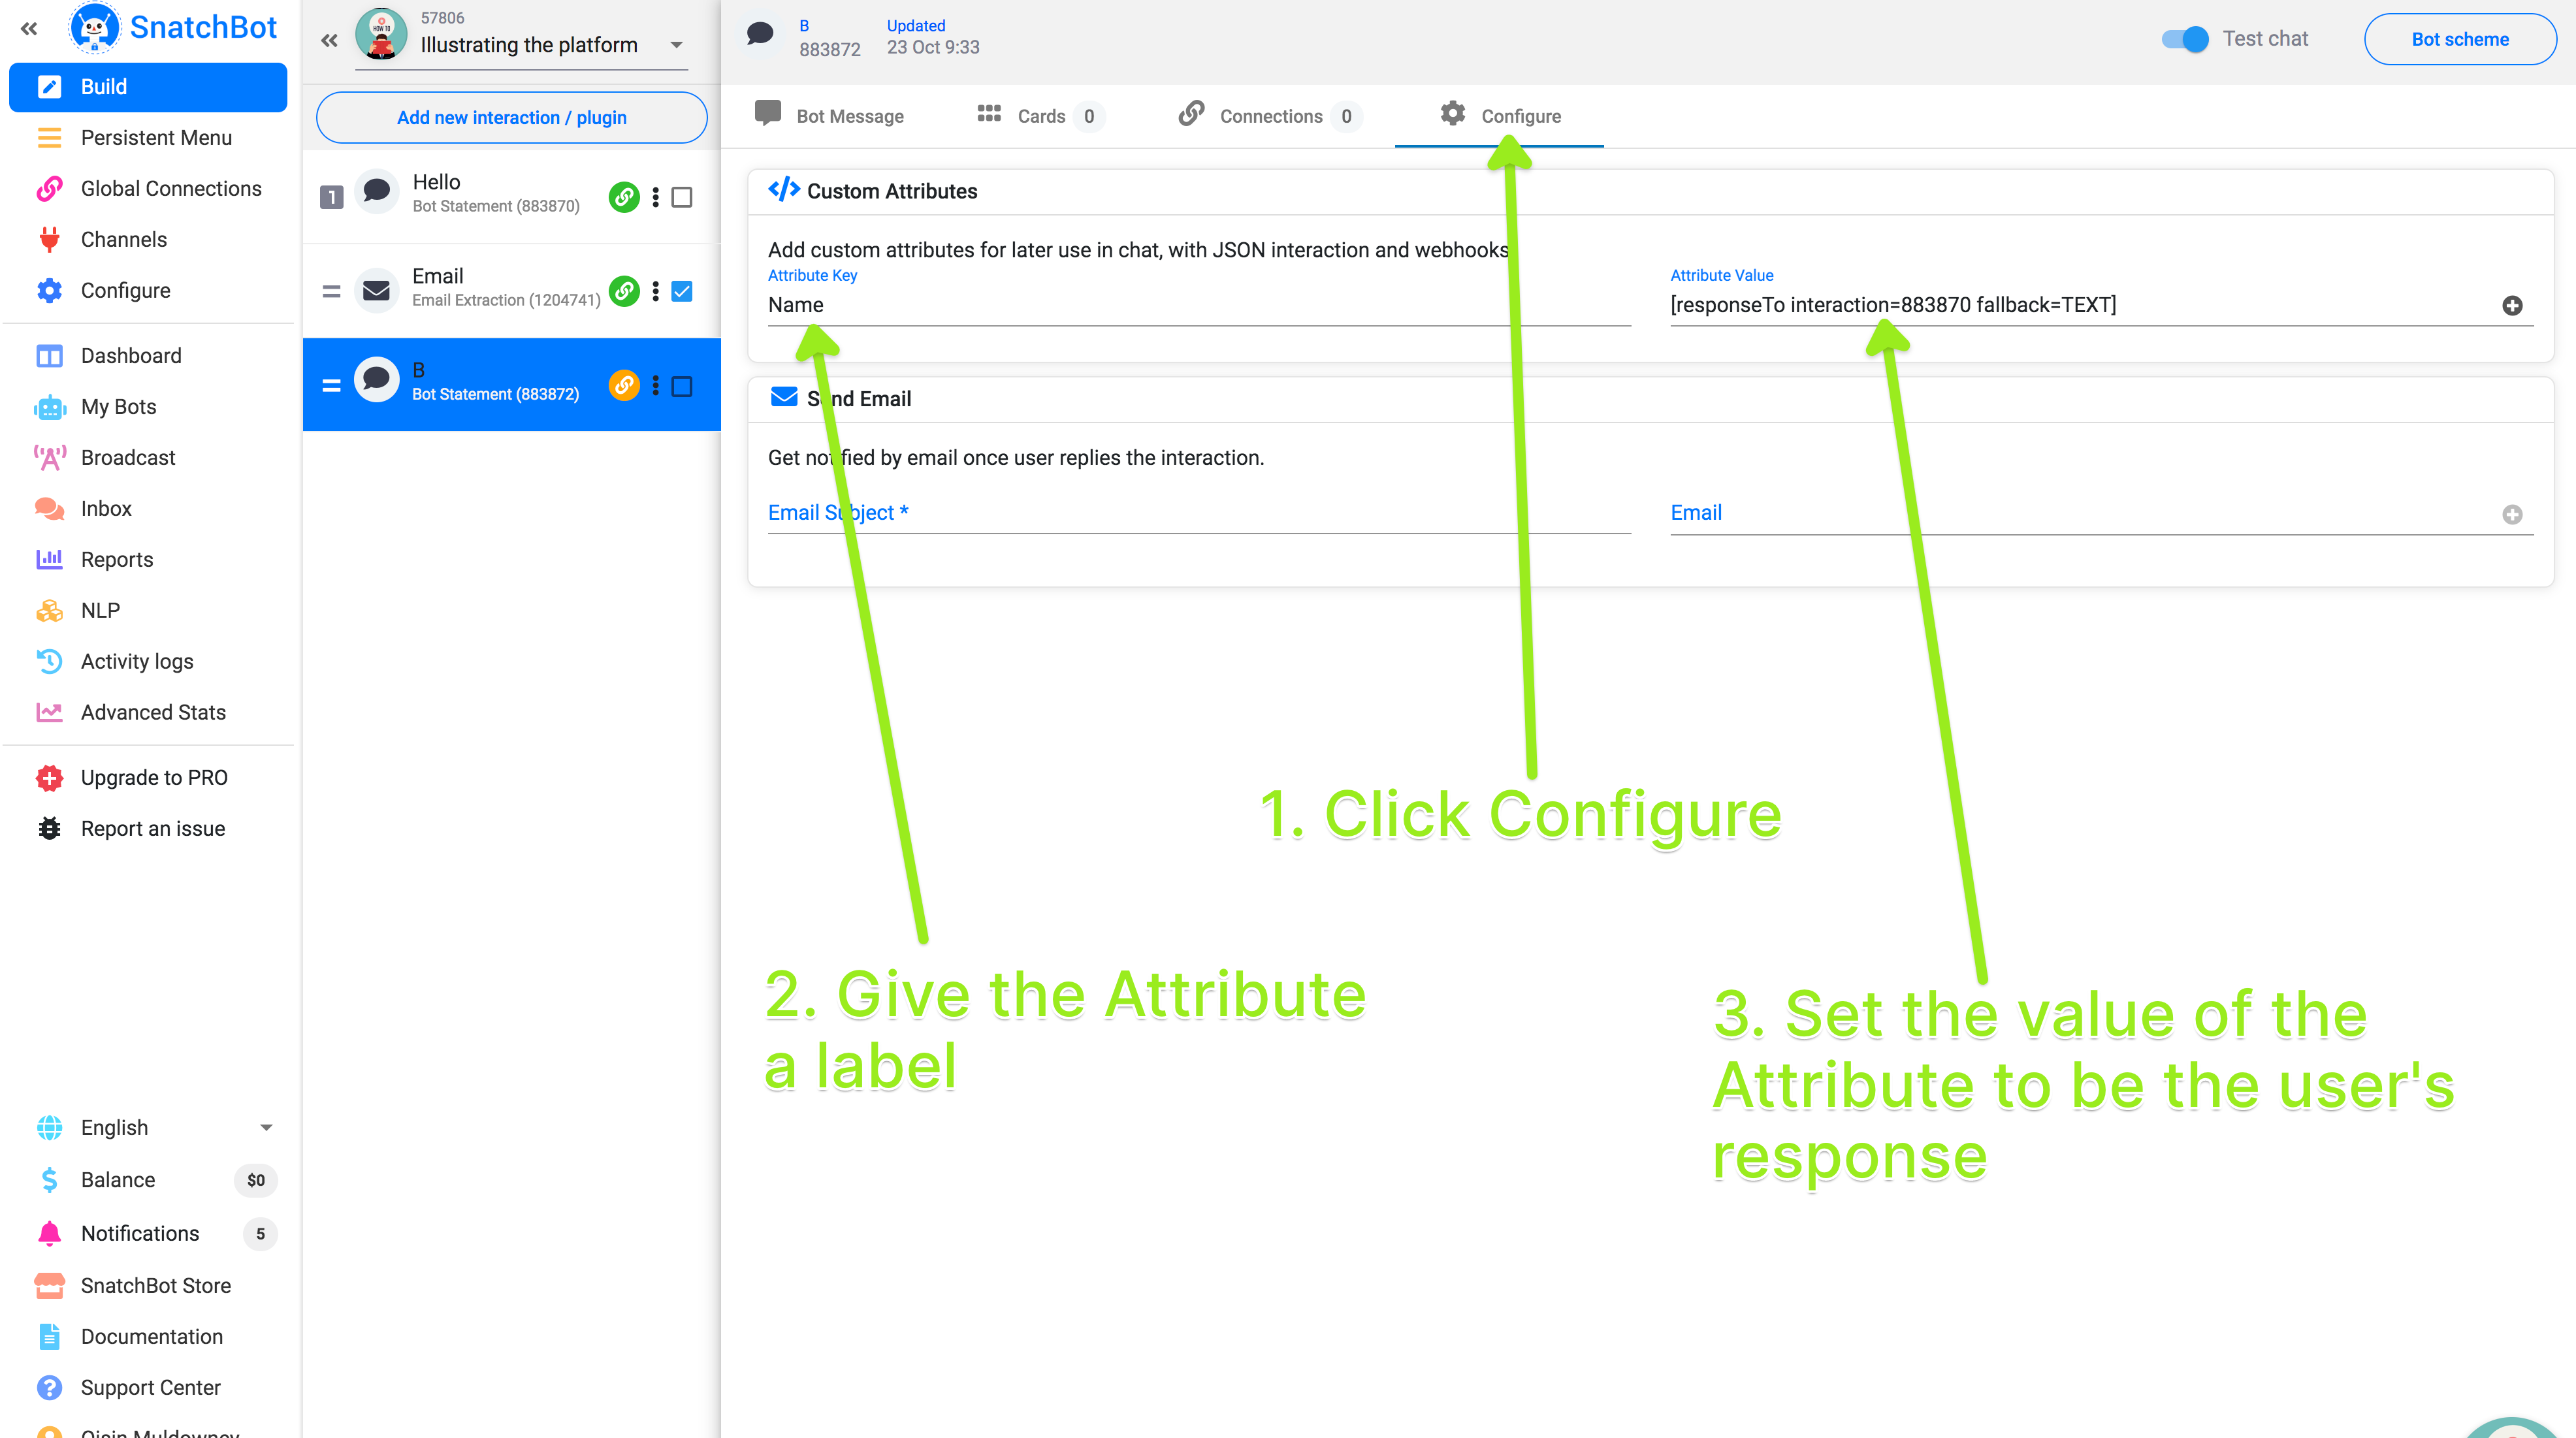
- Lastly, you can do the same in the form of a custom attribute. This is valuable if you want to export the user’s responses. You can export the user’s data in this way as a webhook or JSON API. A custom attribute can also be used to filter your contacts for the purpose of making broadcasts.
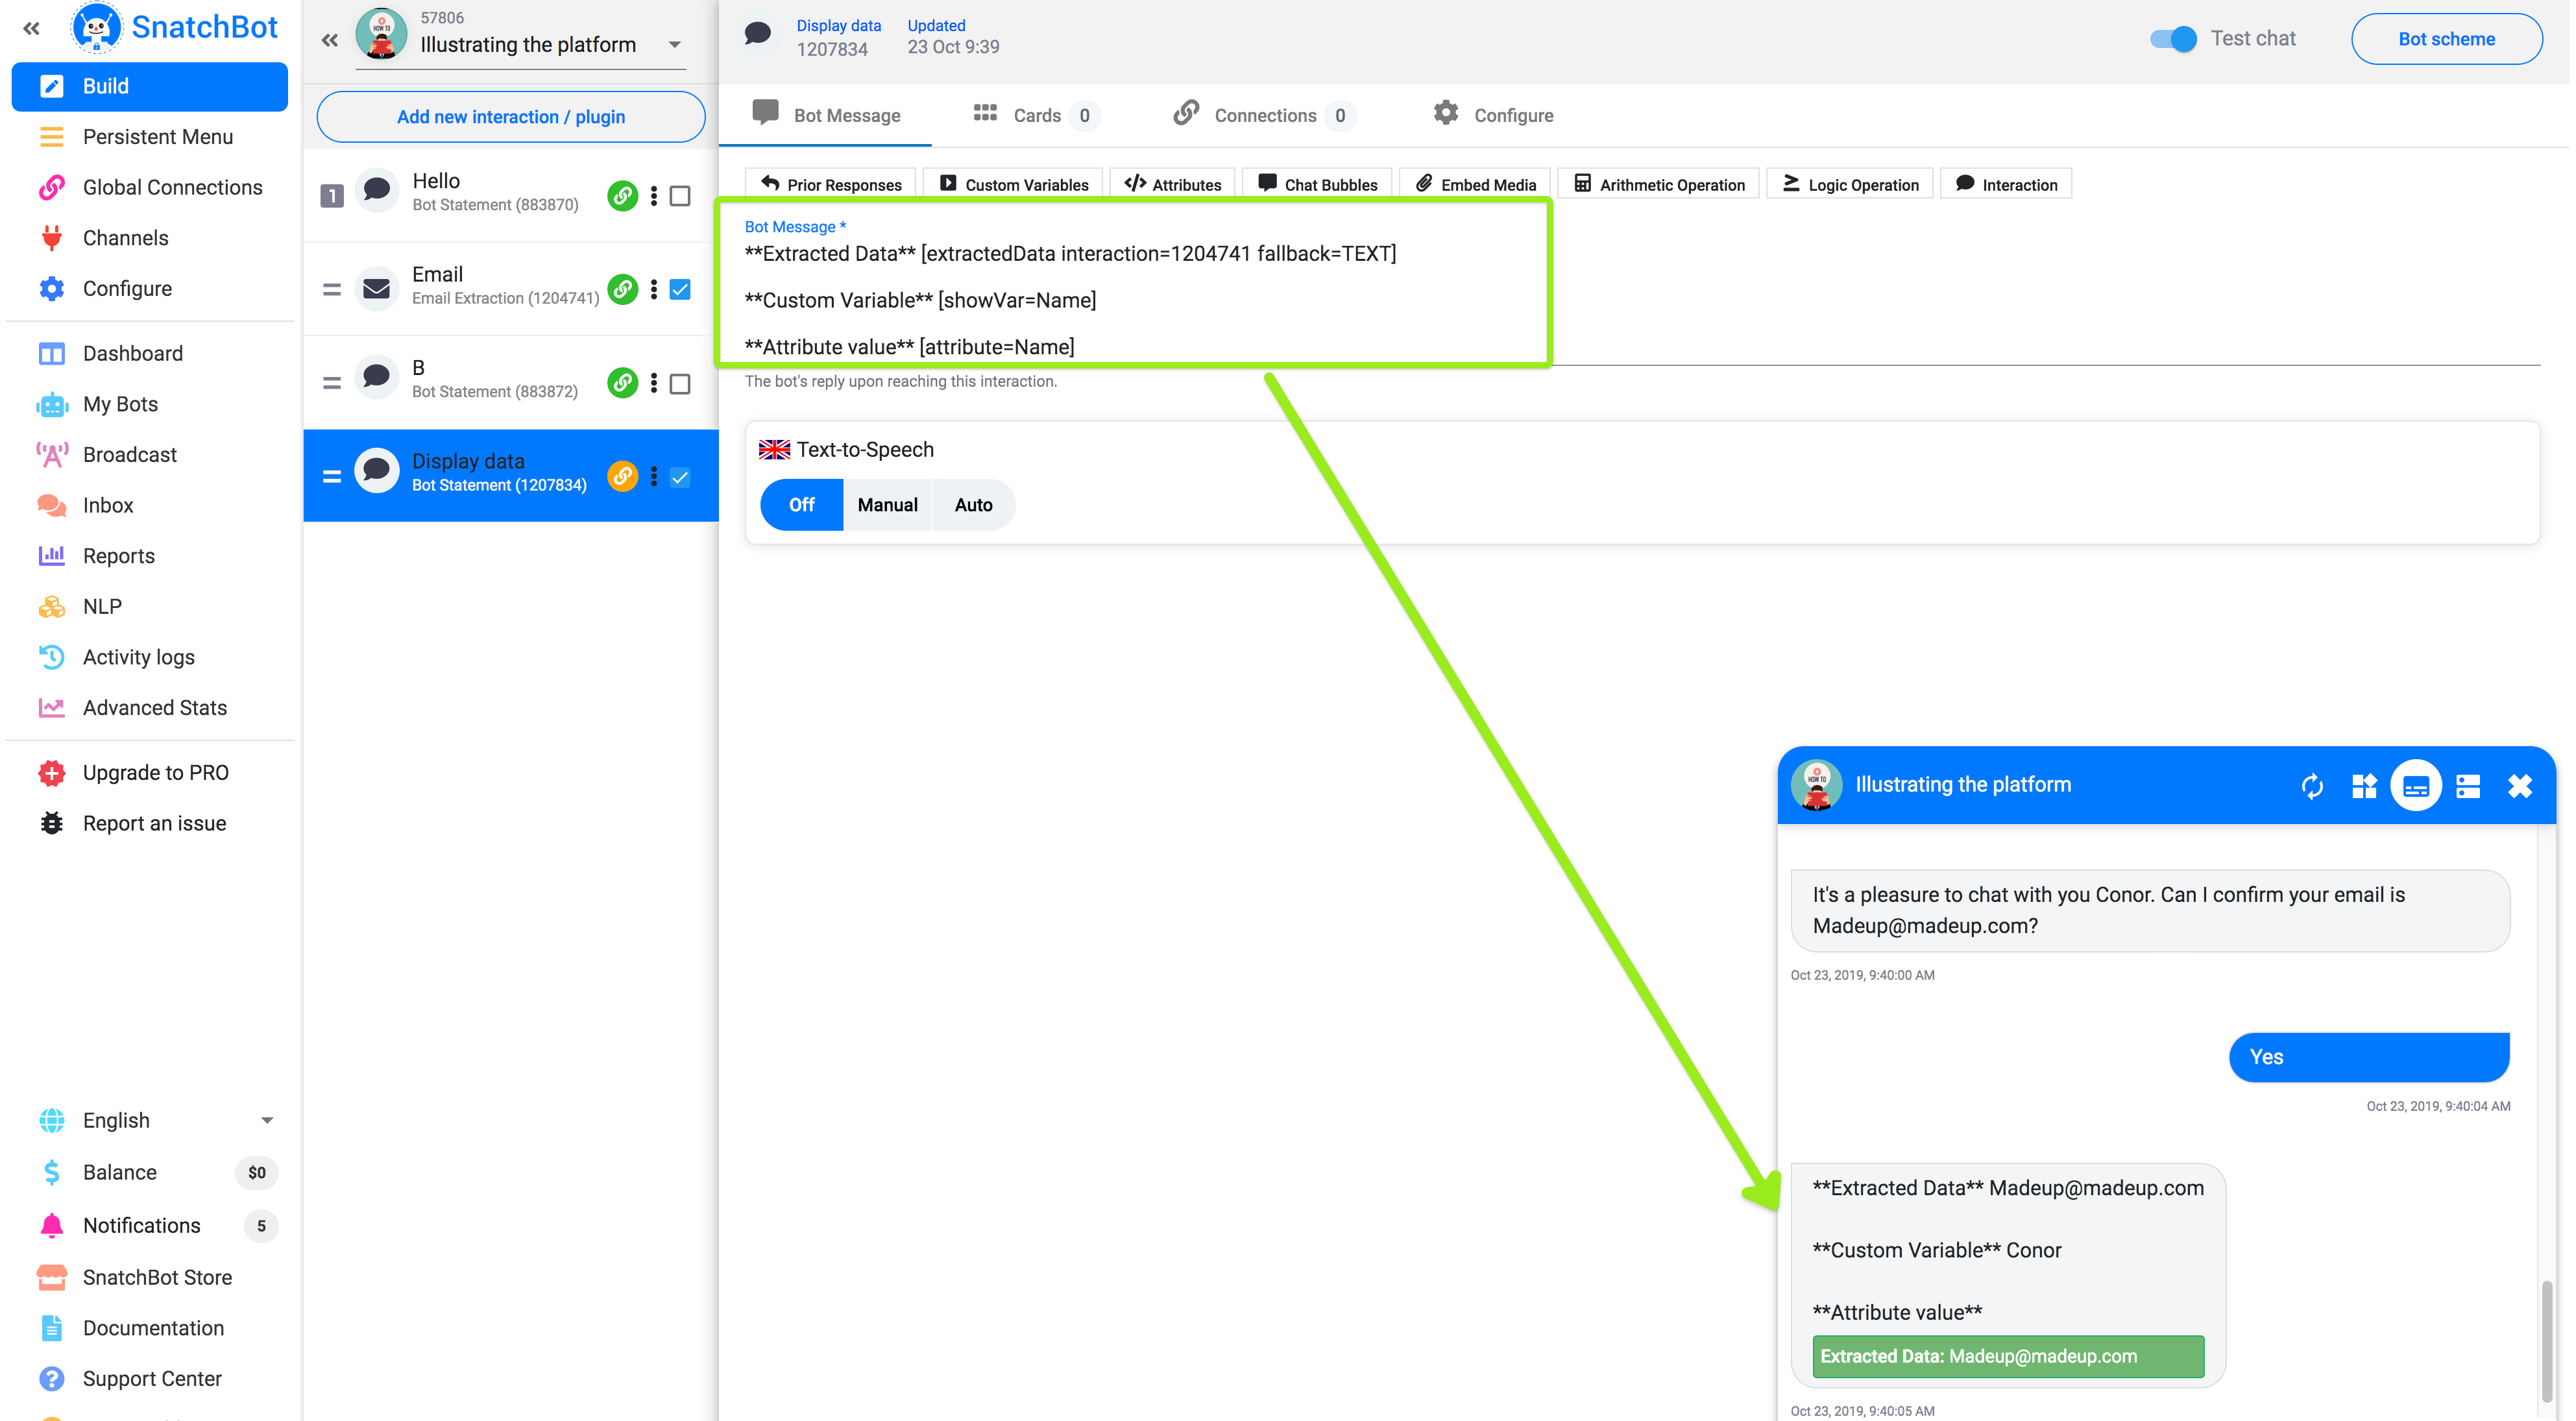
To display the data you have collected in any of these various ways in the conversation, use the commands in this form, with the number 883870 and the label ‘Name’ substituted for your own:
Extracted Data [extractedData interaction=883870 fallback=TEXT]
Custom Variable [showVar=Name]
Attribute value [attribute=Name]
Exporting Chatbot Data through Zapier
Data export is one of the most important features business owners look for when deciding to create chatbots. It allows them to easily export contact information, orders or customer inquiries or feedback.
The powerful combination of a chatbot created on the SnatchBot platform and Zapier automation service allows you to save and process the data that your chatbot has generated. Depending on your needs you can export data to:
| 1. | Google Sheets; |
| 2. | Almost a dozen CRM apps; |
| 3. | MailChimp; |
| 4. | Various support and co-working apps; |
| 5. | … And more than 75 other apps across the web. |
In this tutorial, we will explain to you how to establish a connection between your chatbot and a desired app on the Zapier platform. Start by creating a chatbot or choosing the one that you have already built.
TIP
Chatbots for collecting data should ask clear questions and make use of Email, Phone, Address, URL and other extract interactions.
After you choose your chatbot, log into the Zapier platform. If you still haven’t created your account there, you’ll need to sign up. In time, you might want a premium plan for complex zaps (connections), but to get started you can avail of their 14-day trial and make sure your bot is functioning correctly first.
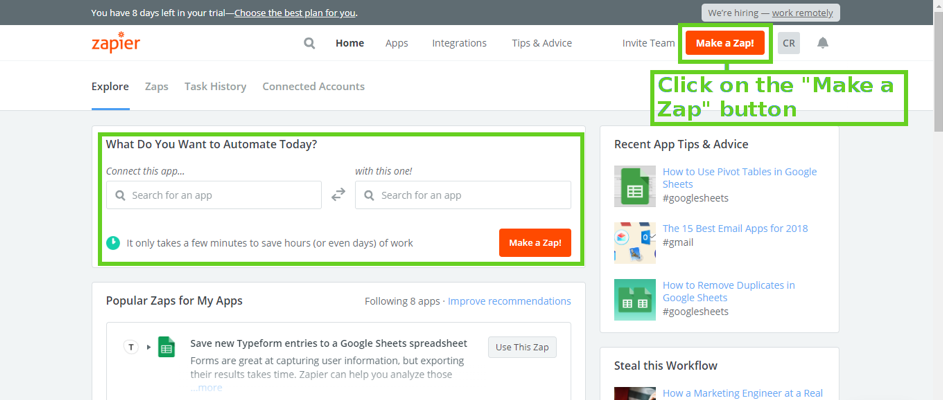
On the Zapier dashboard, find the ‘Make a Zap’ button in the top right corner and click on it. If you already know which apps you want to connect with your chatbot, you can also add them to the input fields in the center of the dashboard and click on the ‘Make a Zap’ button afterward.
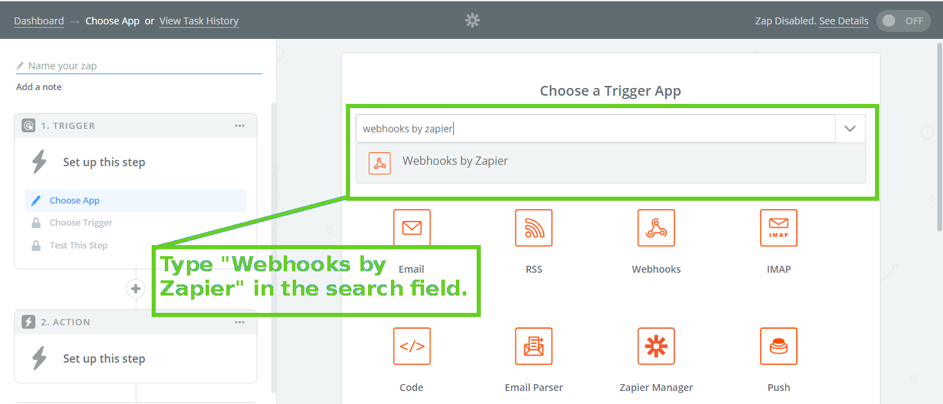
On the next screen, you will see a search field that allows you to choose which app you would like to trigger. Type ‘Webhooks by Zapier’, a specialized app that is designed for receiving, polling and sending HTTP requests. After the app shows up, add it to the trigger with one click.
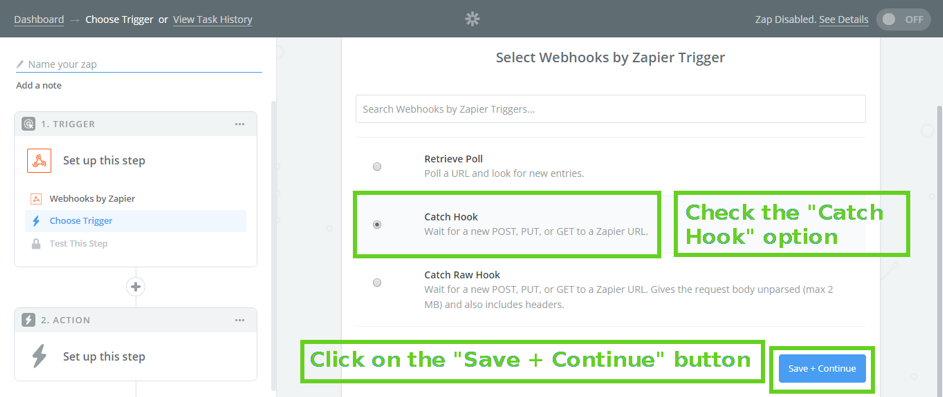
On the next page, choose the trigger action that will start the data export process. Check the middle ‘Catch Hook’ radio button and then click on the ‘Save + Continue’.
The next screen (which allows your Zapier trigger app to focus on a particular part of the bot’s request) is irrelevant since you will be able to quickly and transparently choose the desired parameters later on. Just click the ‘Continue’ button.
After you do this, the Webhooks by Zapier app will provide you with a webhook URL, that you should copy, by clicking the ‘Copy’ button.
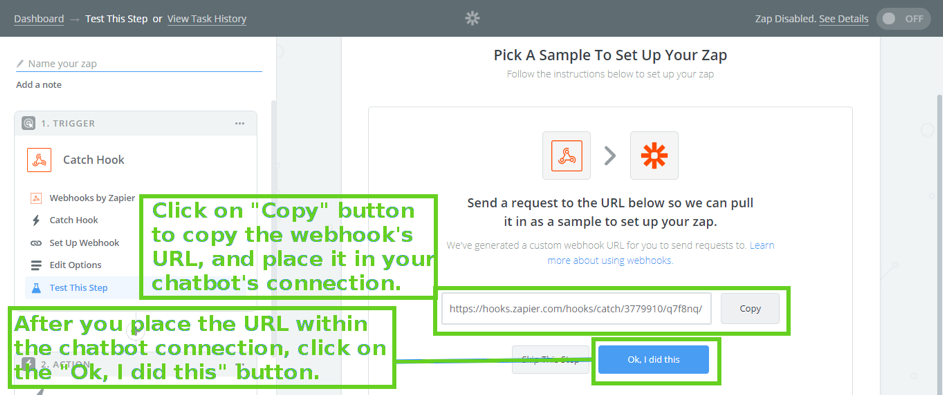
Paste the copied URL to your chatbot. If you would like to export all your user answers, we advise you to add the URL to the ‘Set the Webhook for entire bot’ input field, on the ‘Configure’ page.
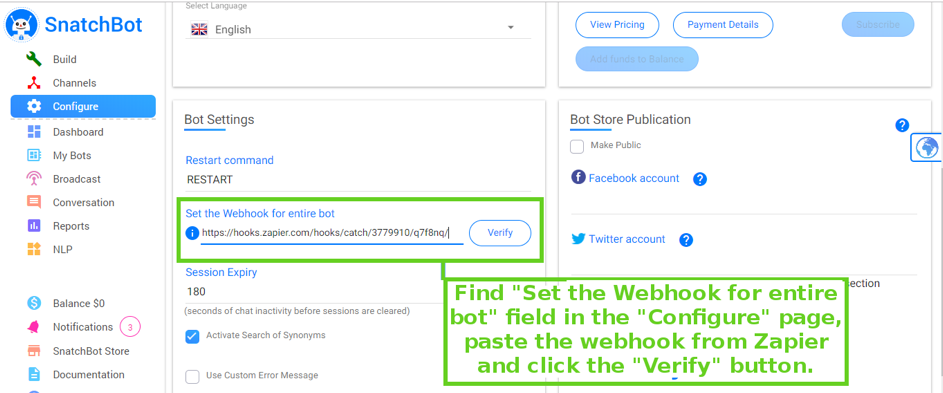
After pasting the URL, click on the ‘Verify’ button, and if the ‘Status: 200’ pops up, everything is set.
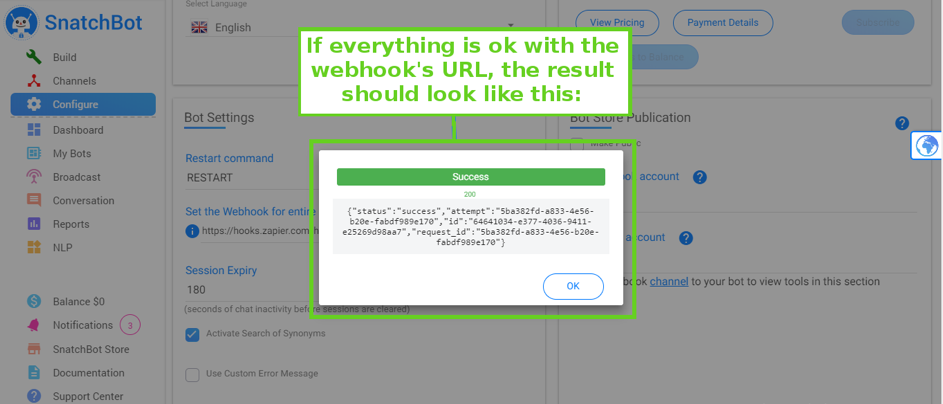
If you see an error, try pasting the webhook again, check your internet connection and if none of this helps, go through the whole process one more time, and get another webhook URL.
Note
Several users reported that sometimes even when the URL verification shows an error message, the webhook connection works fine.
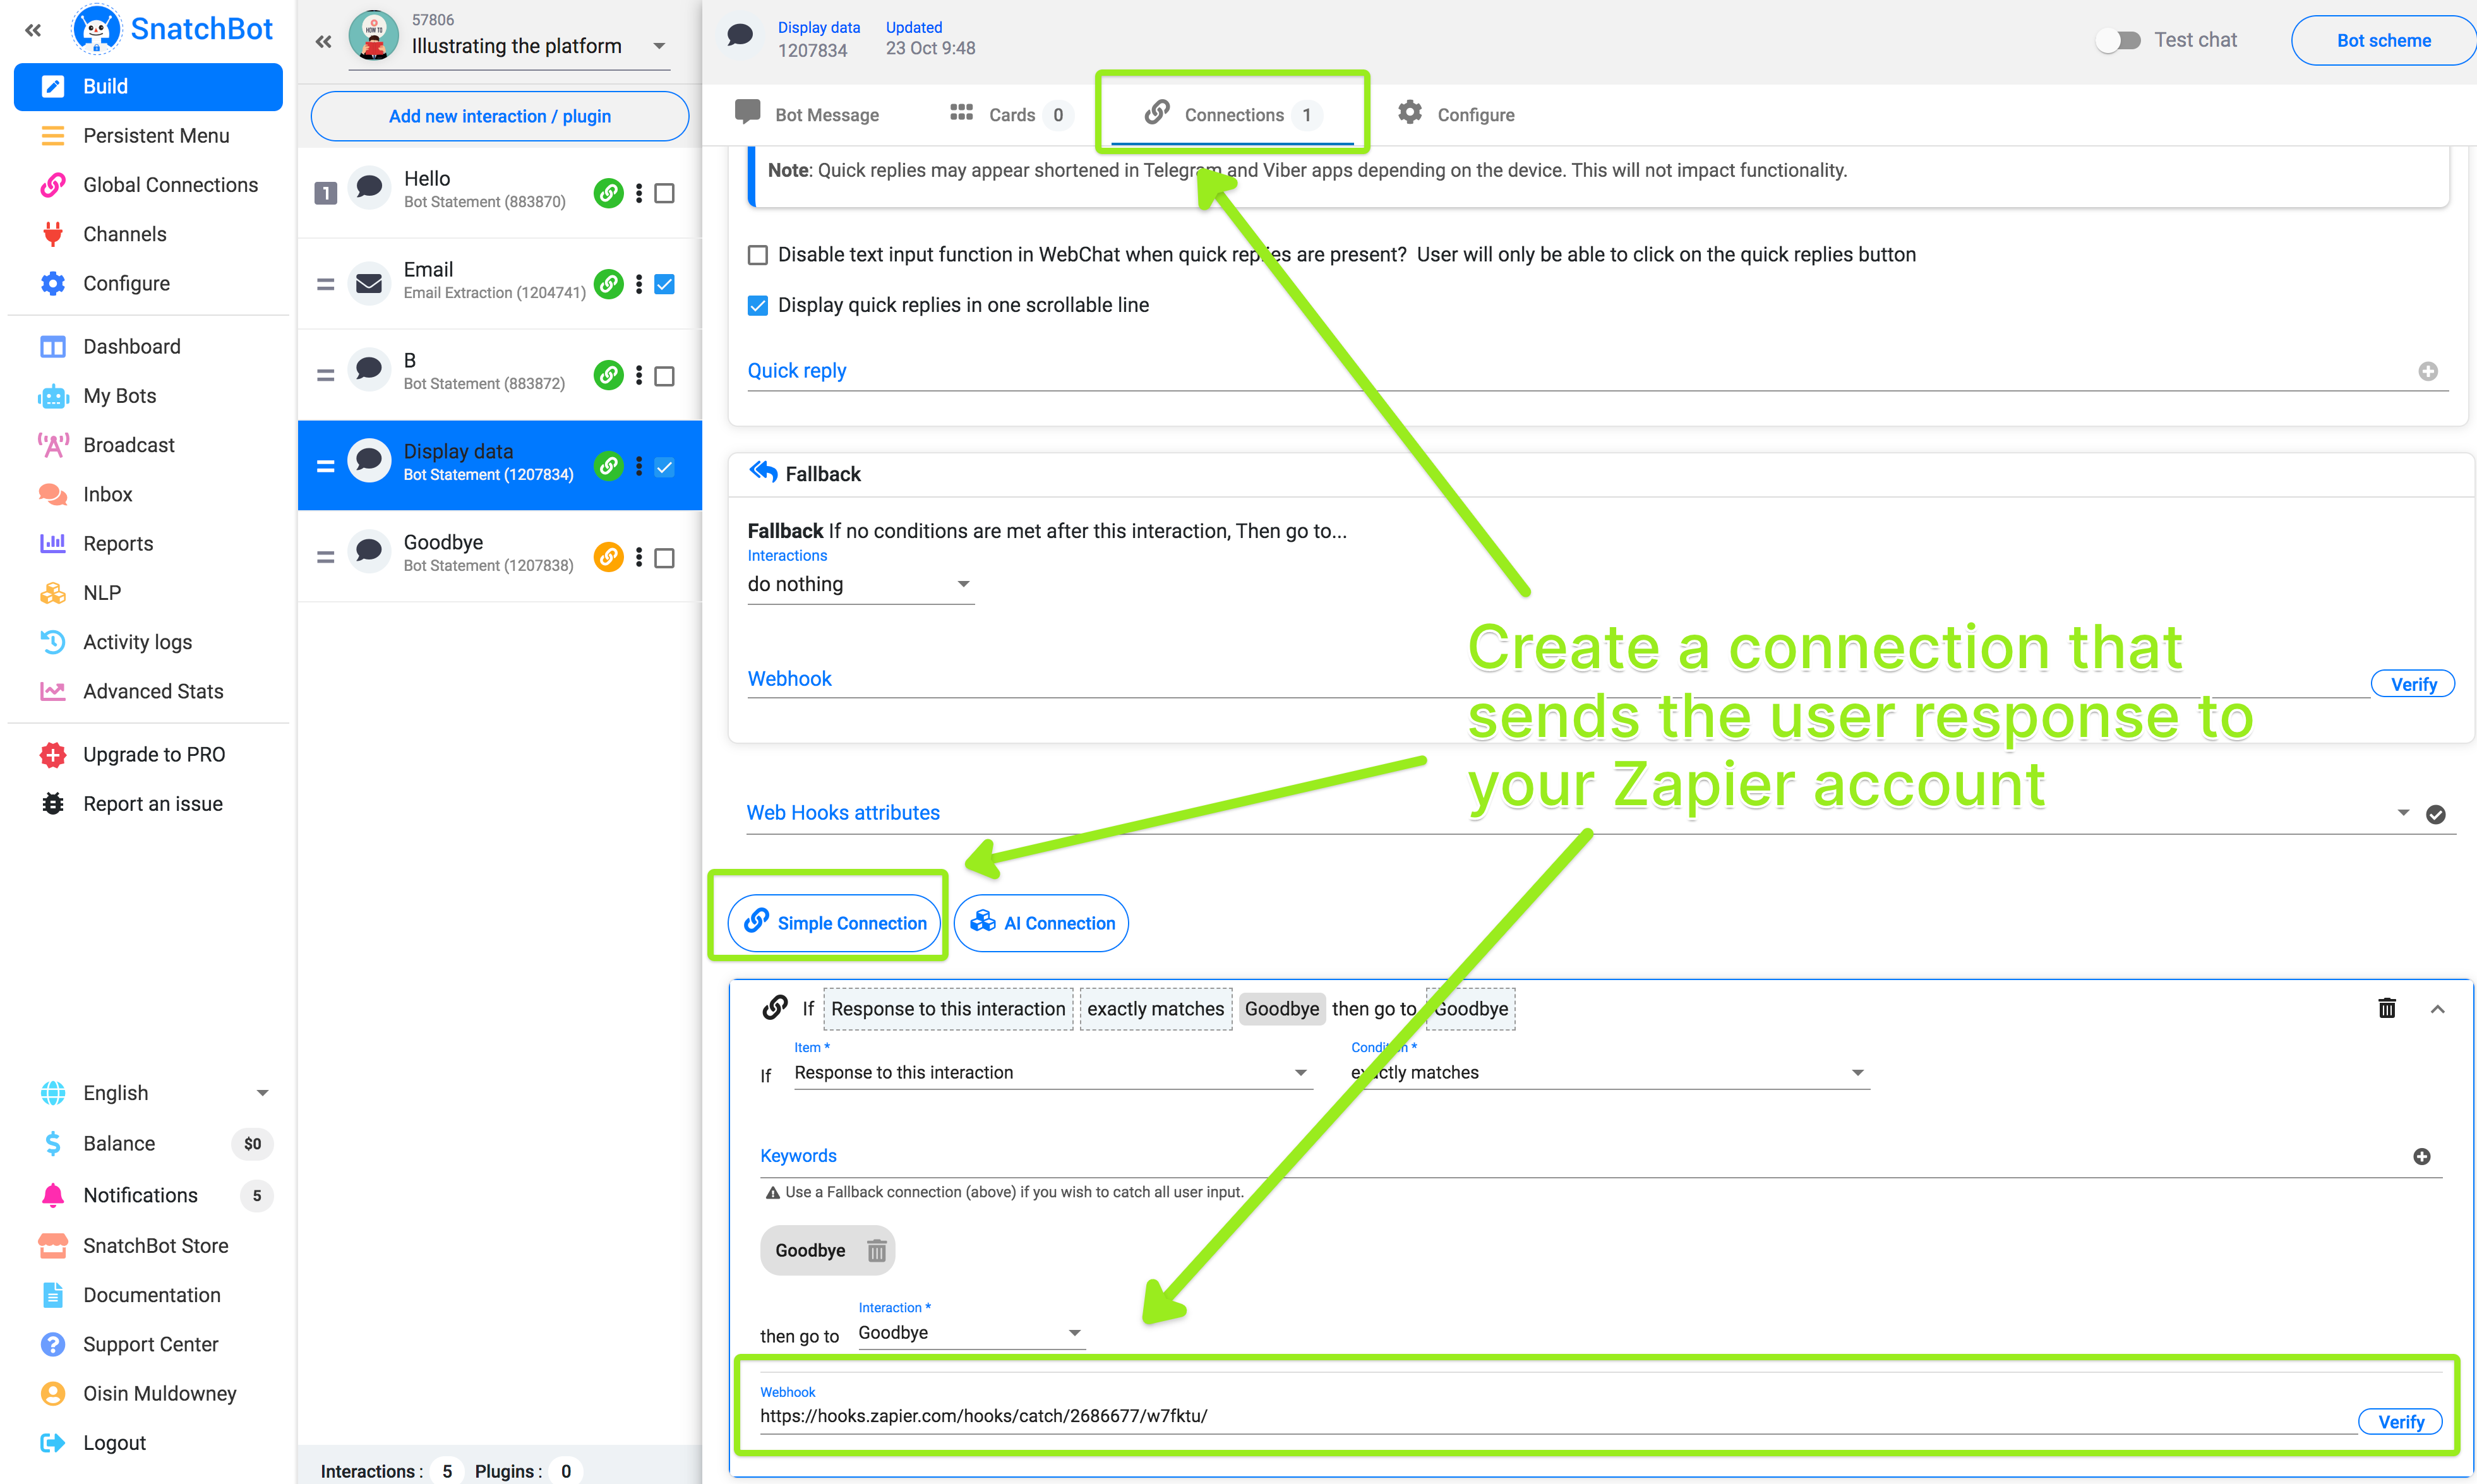
If you would like to export specific user answers, paste the webhook in a Quick Answer, Global, NLP or Regular Connection within your chatbot. Make sure that you leave a few interactions between the one where a user is supposed to provide the data that will be exported and the one where your webhook URL is located. This way you will be able to save the user's answers as variables or attributes and send them all in one batch, thus using fewer zaps and tasks on the Zapier platform.
Note
When exporting users’ data make sure you program the bot to link to your Privacy Policy or otherwise explain the purpose of this act: specifically, describe your storage facilities and ask users to approve the data export, storage and later use. In other words, we strongly urge that you ensure your data collection is GDPR compliant.
The webhook URL is pasted in the same way as in the input field on the ‘Configure’ page. Every connection has an input field for it, and you can check the webhook’s status by clicking the ‘Verify’ button.
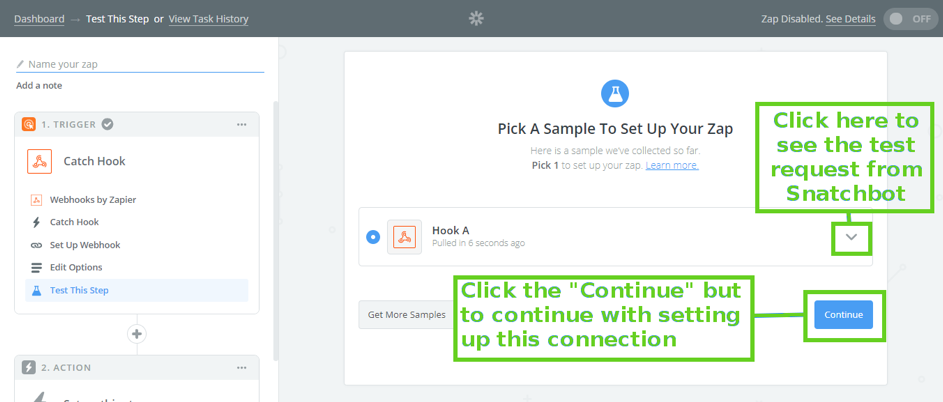
After you set everything up, go back to the Zapier platform and click on the ‘Ok, I did this’ button. Zapier will then poll the URL to test it. You will be able to see the HTTP request that is received from your chatbot, by clicking the downward arrow. The POST request might be empty if you haven’t tested the chatbot’s conversational flow yet, but that is ok.
After a successful test, click on the ‘Continue’ button.
Setting up the connection with a 3rd party app
Now after we established a webhook connection between our chatbot and the Zapier platform, we need to choose the app that will receive data. When it comes to lead exports, popular options include:
| 1. | Google Spreadsheet; |
| 2. | Google Contacts; |
| 3. | MailChimp (if you want to send newsletters) |
| 4. | Other CRM apps (on Zapier you can find: HubSpot CRM, Salesforce, Highrise, Clevertim, Insightly, Vtiger, OnePageCRM, Act!, Capsule CRM, Solve CRM, Nimble, Batchbook, Nutshell, Streak, Contactually, Sales Force IQ, Close IO, Clinch Path, Pipedrive, ProsperWork, Zoho CRM, Base, SugarCRM, Pipeliner, PipelineDeals, Podio, Odoo, TrackVia, and many others.) In this example, we will show you the simplest way to export your lead data to a Google Spreadsheet. |
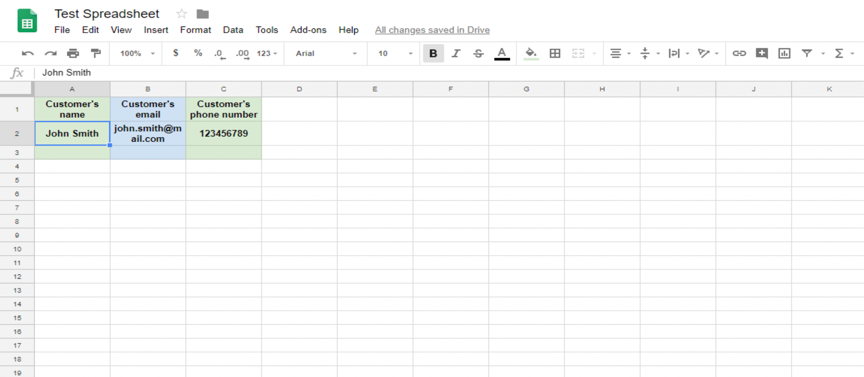
First, you should create a Google Spreadsheet, name it and add as many columns as you wish. Check out our example:
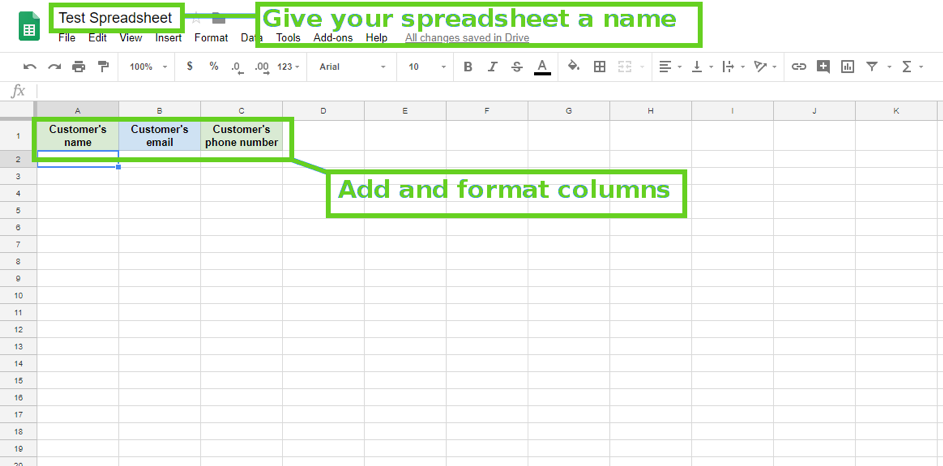
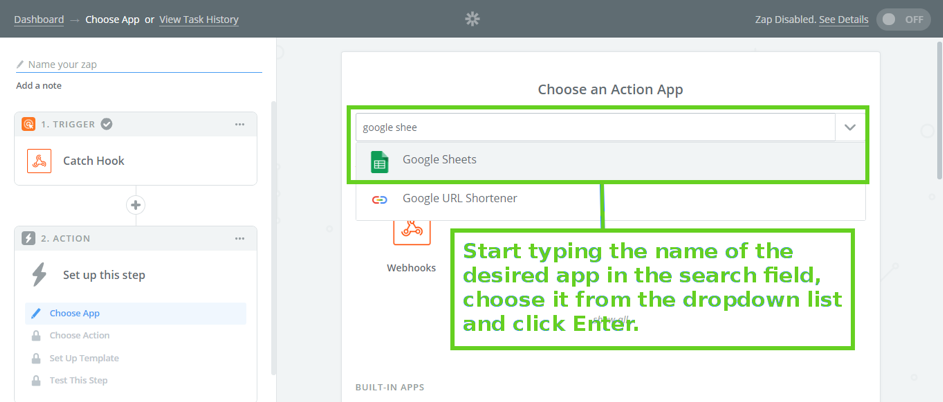
Then go back to Zapier and start typing Google Sheets in the action app search box. Click on this app’s name after it shows up in the drop-down menu.
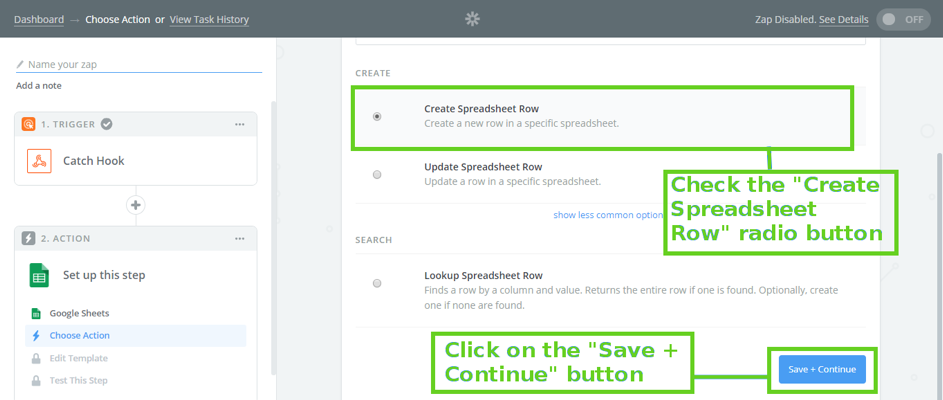
On the next screen, you should choose the action this Zap will initiate after receiving a webhook. If you want to add all data (saved as variables or attributes on SnatchBot) from one request, check the ‘Create Spreadsheet Row’ option, and click on the ‘Continue’ button.
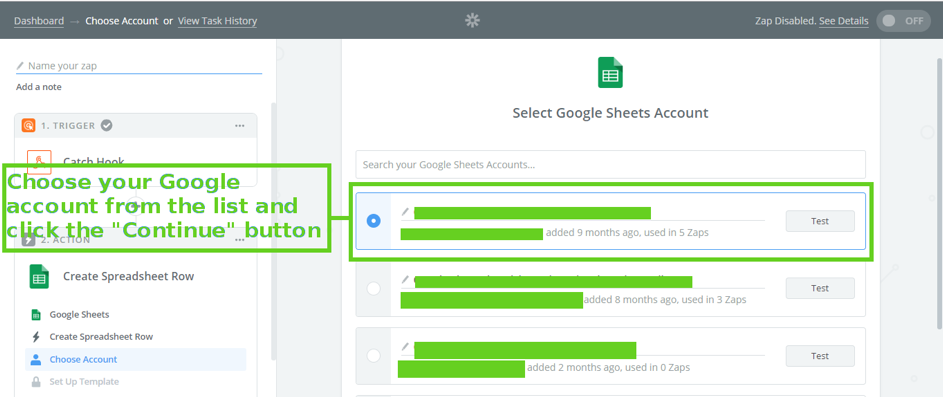
The next screen will allow you to connect Zapier with your Google account. If you already used Zapier with Google apps, you will see one or a few Google accounts on your screen, depending on how many of those you have connected before. If not, click on the ‘Add Account’ button, enter your Google credentials and connect account with this zap.
After you have done that or chosen the account where your spreadsheet is located, click the blue ‘Save + Continue’ button. You can test the connection between your Google account and Zapier, right away, or at the end of this process.
The next screen allows you to set a spreadsheet template, which is the essential step in creating a zap. You will need to arrange the webhook parameters’ placement within your spreadsheet. Data can be added to different columns, but first, you need to choose your spreadsheet by clicking the downward arrow. After that, pick a worksheet.
Zapier will load all spreadsheet columns and you should pick one or more parameters for each one. You can also write custom text next to or around the parameters. If you don’t see the desired parameter, click on the ‘Missing option…’ and retest the webhook connection. If the parameter is still missing after that, check whether you have correctly set all the attributes and variables within the chatbot’s conversational flow.
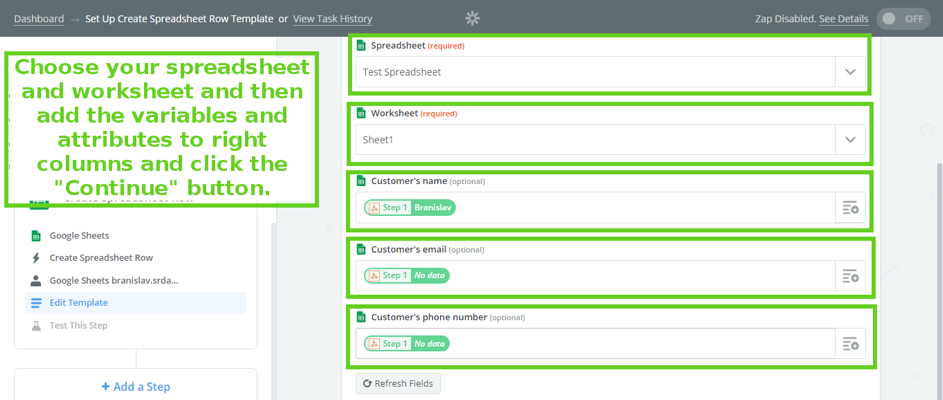
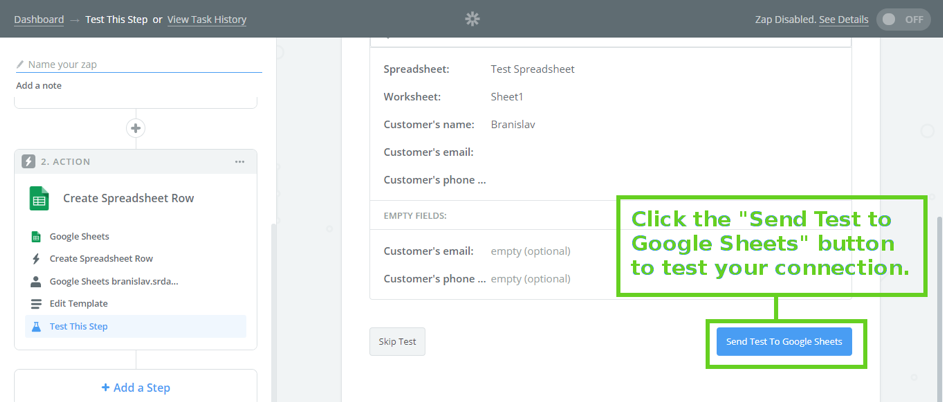
When you finish with adding parameters, click on the ‘Continue’ button. You will see all the saved data, and you should click on the ‘Send Test to Google Sheets’ button.
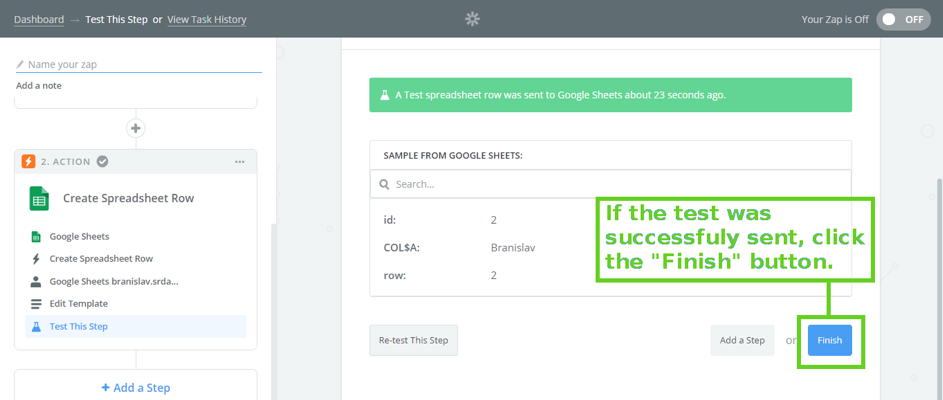
If the test was successfully concluded, Zapier will notify you with a message on the green stripe. Now you just need to click on the ‘Finish’ button.
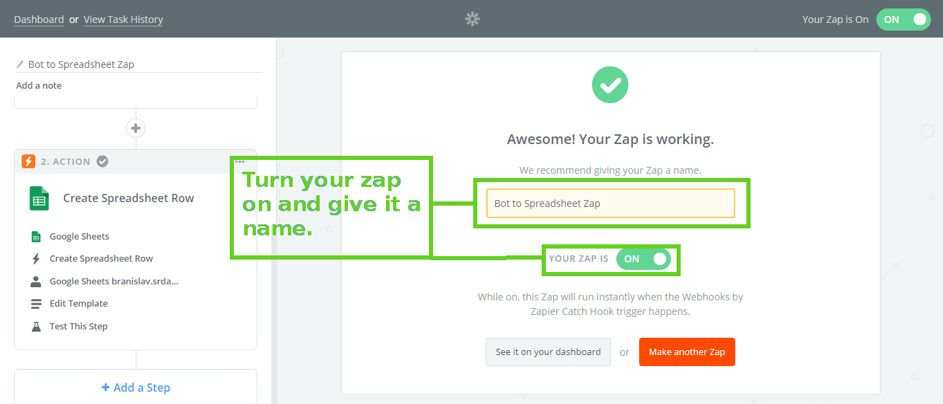
The last step, is setting your Zap to ‘On’ and naming it.
Tip
If you plan to use Zapier platform frequently, you will probably have dozens of zaps, so choose their names wisely, and use the name of the chatbot or its function.
Before you deploy your chatbot on your Facebook page, desired instant messaging app, or your website, you should test the zap connection.
First talk to your chatbot, all the way to the end of its conversational flow.
Then go the Google Spreadsheet, and check whether the data you sent to the chatbot is there and whether each information is placed into the right column.
If everything is all right, you have just learned how to export your chatbot data to a Google Spreadsheet, with the help of Zapier platform.
Watch this video tutorial ''How to work with user responses on the SnatchBot platform''
Updated over 4 years ago
How to Connect Your Chatbot With Third-Party APIs with the Help of Integromat
