User Attributes
User Attributes are pieces of information, like name or location, that can be assigned to each user interacting with your bot.
User attributes enable bot personalization, advanced flows, subscriptions to broadcasts and much more in your bot. They are a simple, but very powerful tool to bring your bot to the next level.
Note
There are two types of Attributes available for use: Facebook Attributes and Custom Attributes.
We do not advise defining and using the attribute value in the same interaction. All operations will be performed with the previous value.
Facebook Attributes
Facebook Attributes are pre-populated for you (and cannot be modified). When the user interacts with the chatbot for the first time, Facebook sends this data, subject to user settings. This allows you to address the user by name, for example.
For reference, this is the Facebook documentation on this topic: https://developers.facebook.com/docs/messenger-platform/identity/user-profile
You will find all the Facebook Attributes as well as the GET and SET attribute phrasing under the drop down menu.
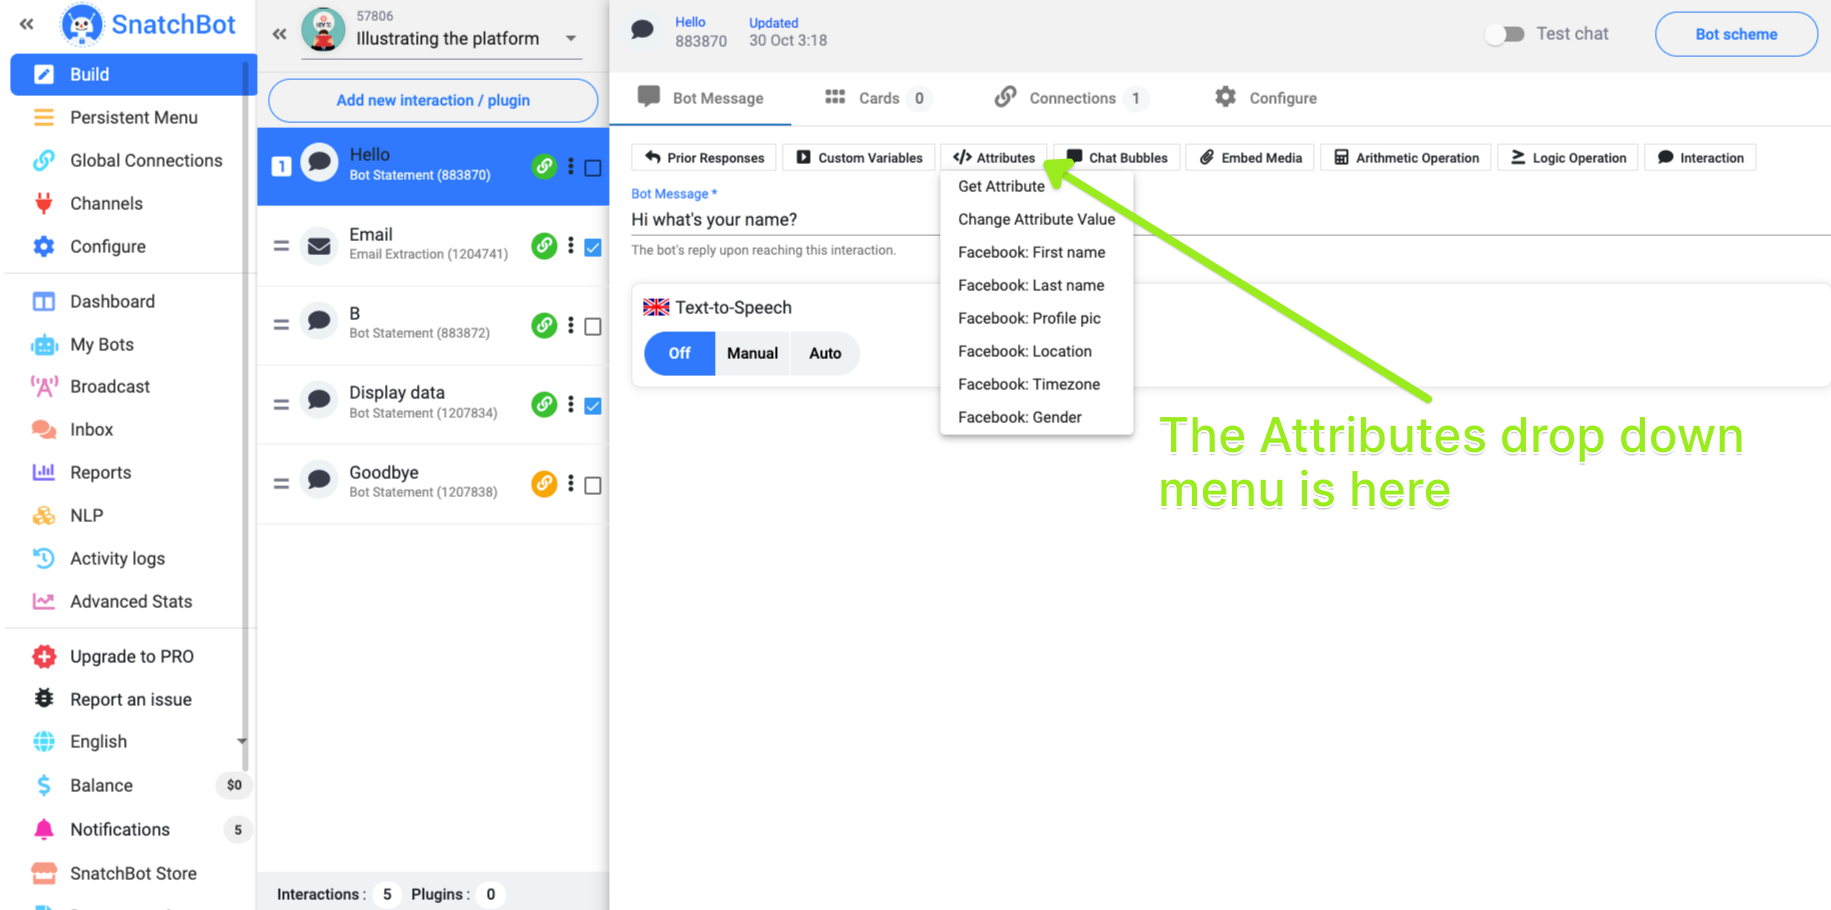
The Attribute drop-down menu gives you quick access to Facebook Attributes.
Facebook attributes are active and can be used with the Facebook channel.
Facebook attributes are also available in the following channels:
Telegram - [attribute=first_name] [attribute=profile_pic]
Skype - [attribute=first_name]
Line - [attribute=first_name] [attribute=profile_pic]
FB - [attribute=first_name] [attribute=last_name] [attribute=profile_pic]They become available once the user performs any action with the bot connected to the Facebook channel (such as starting a conversation or sending the bot a message).
Below is the list of available Facebook Attributes with corresponding keys. They are provided by Facebook Automatically.
| Facebook Attributes | Corresponding keys |
|---|---|
| first_name | First name |
| last_name | Last name |
| profile_pic | Profile picture |
| locale | Locale of the user on Facebook (language) |
| timezone | Timezone, number relative to GMT |
| gender | Gender |
The pre-defined Facebook attributes are used in the same way as a custom attribute.
Custom Attributes
You can create your own attributes easily by using the Custom Attributes tool under the Configure page.
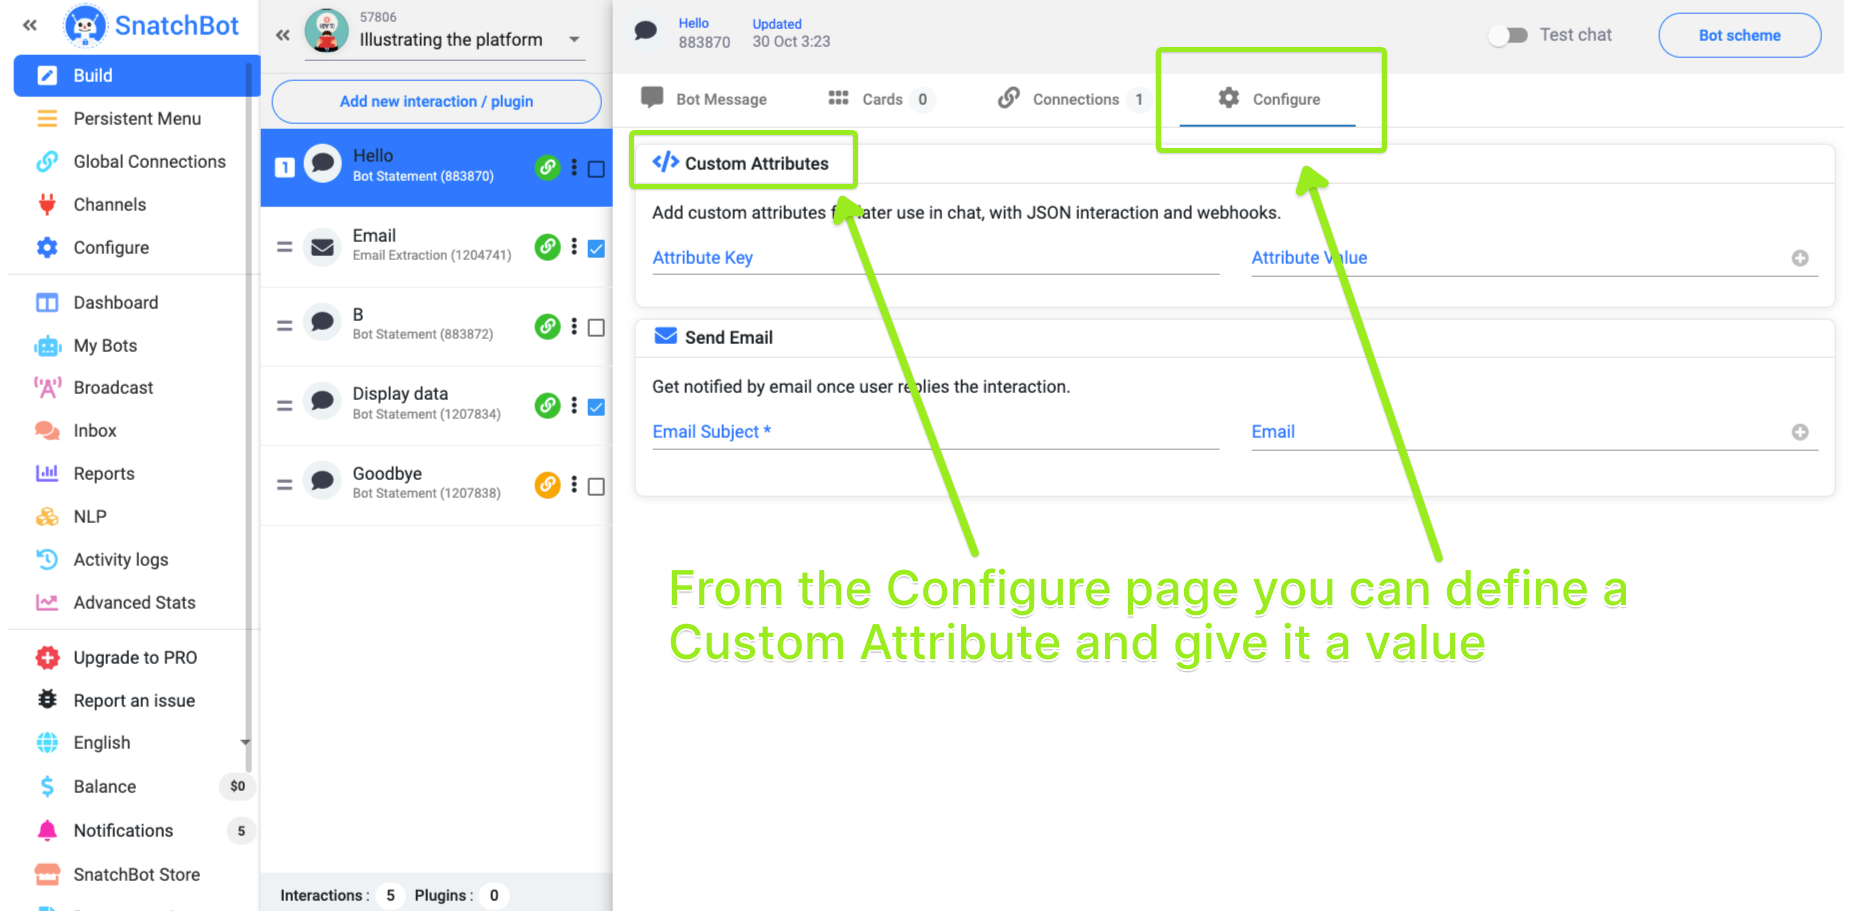
Custom Attributes can be defined in every interaction.
The Attribute 'Key' is the name you give the Attribute and the 'Value' is something that you can define alphanumerically or you can draw on a user's prior response. Below you can see some examples of how the attribute value can be defined. This value is set once the attribute is used in this bot for the first time.
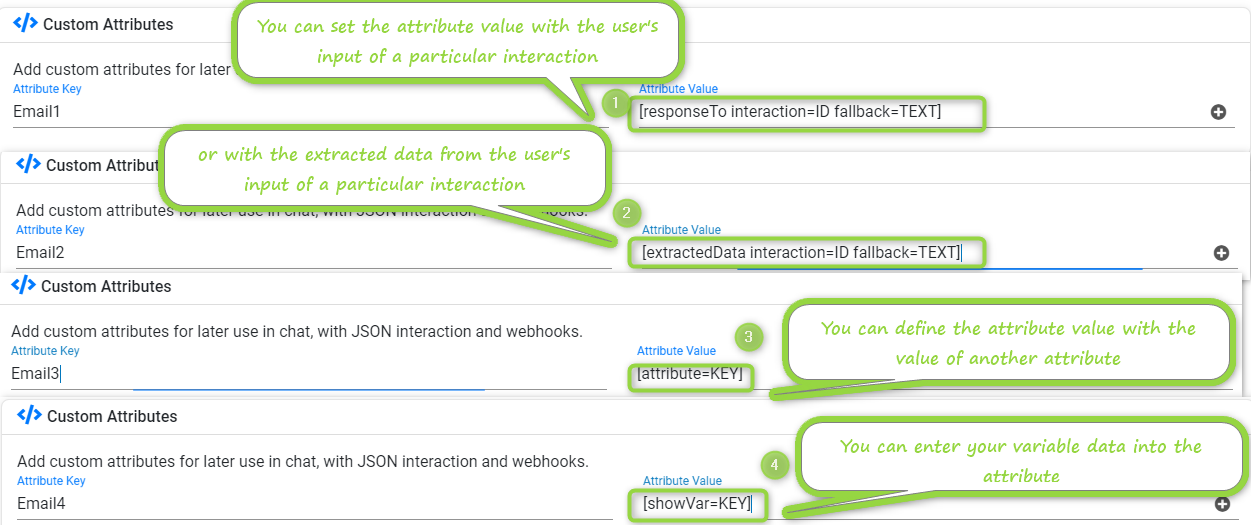
The Attribute can be drawn down and its value placed in the conversation by adding [attribute=KEY] (via the shortcut in the dropdown menu above the message or manually), where KEY is the name of the attribute. Once the Custom Attribute is set, it is available throughout the conversation.
Note
Only alphanumeric names are allowed in Attribute KEY names, please don't use special symbols.
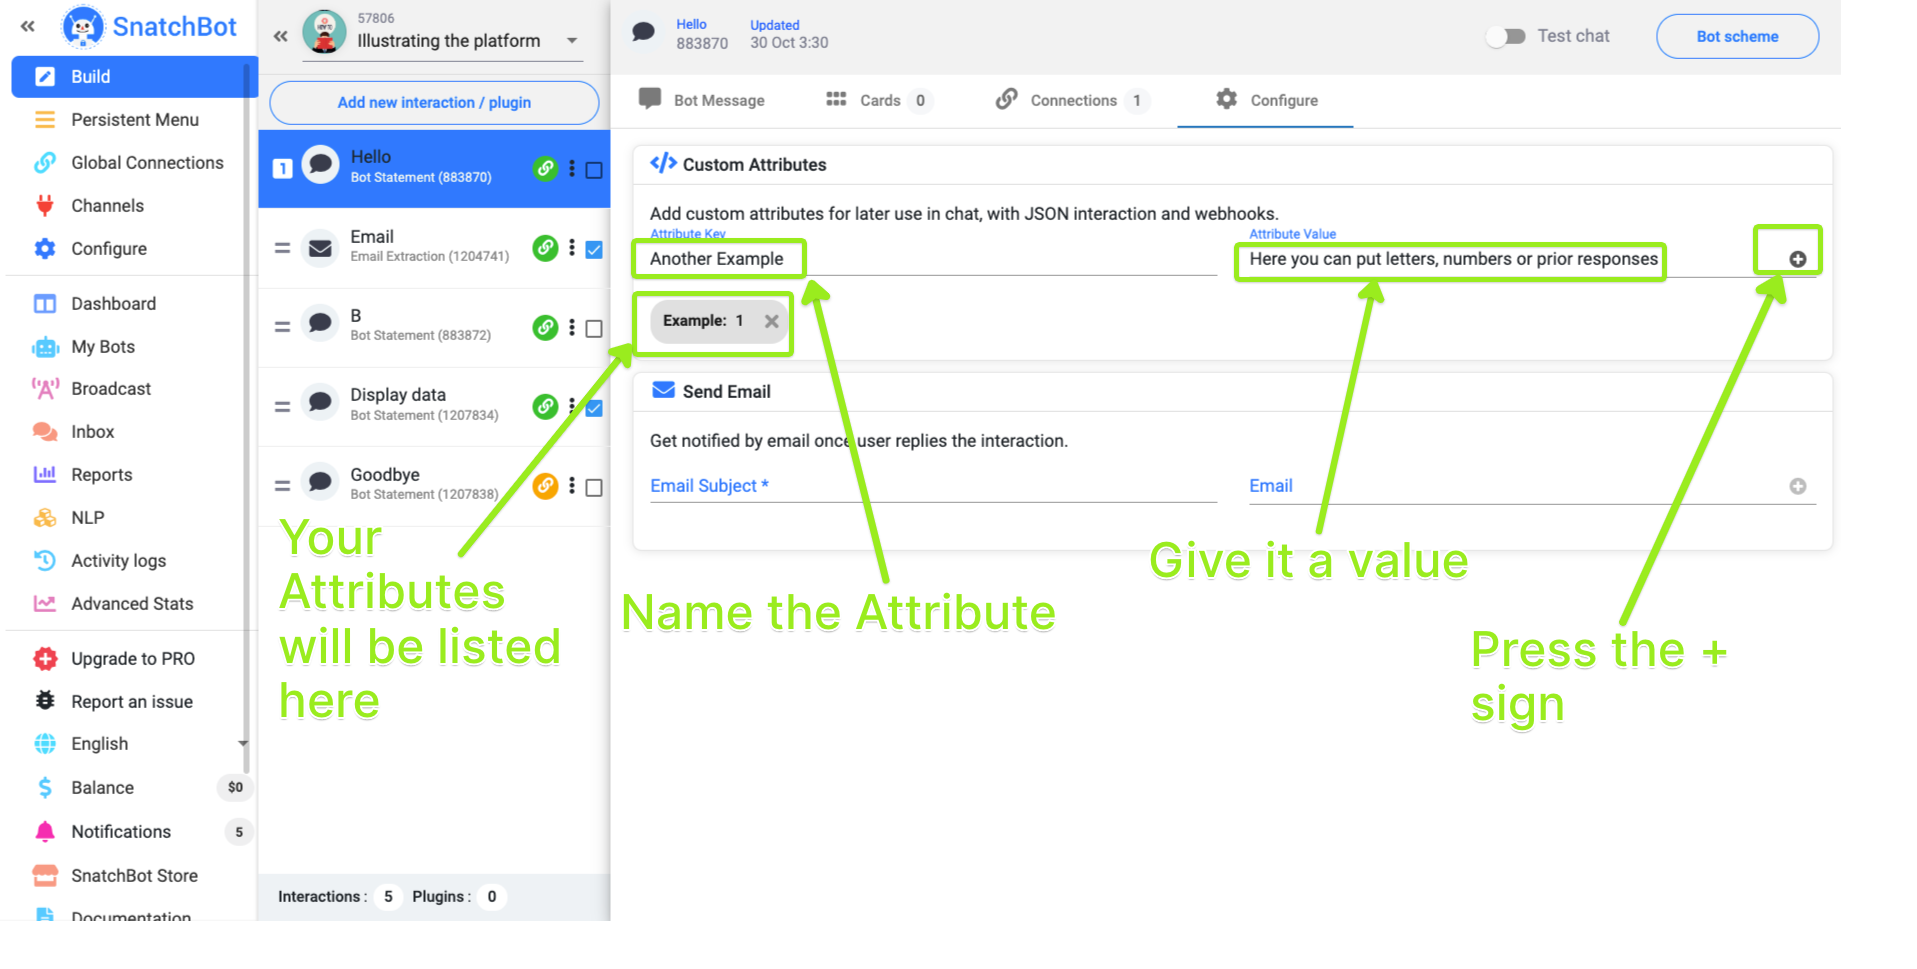
Custom Attributes can be set via the Configure menu in each Interaction.
Advanced Custom Attribute
Be careful when using the ResponseTo, ExtractedData options to give a value to a Custom Attribute. These can only be used after the required response has already been given by the user. In other words, you can't define an Attribute by a ResponseTo option of the same interaction or later ones. The prior response data must come from an earlier interaction to the one the Custom Attribute is defined in.
Note that this value will be taken only ONCE during the first user session with a bot. In the next sessions it will not be renewed and user's input will be saved until manually set to a new value with setAttribute function.
Attributes in Test Chat
Note that attribute values are stored permanently for the userid. Once set, it can only be modified by using setAttribute.
Test Chat always behaves like a new visitor without any previous history and attributes are not stored and cleared with each restart on the bot in Test Chat.
Note
Do not name Custom Attributes with standard Facebook key names, as the result may be unpredictable.
You can use Custom Attributes (as well as Custom variables) in Text Cards and in Gallery Cards. More information on this option is available here.
Usage (JSON API & Webhooks)
Both types of attributes can be sent outside the platform via:
- JSON interaction as parameters. The user needs to pick the ones needed from the dropdown menu under Add Attribute.
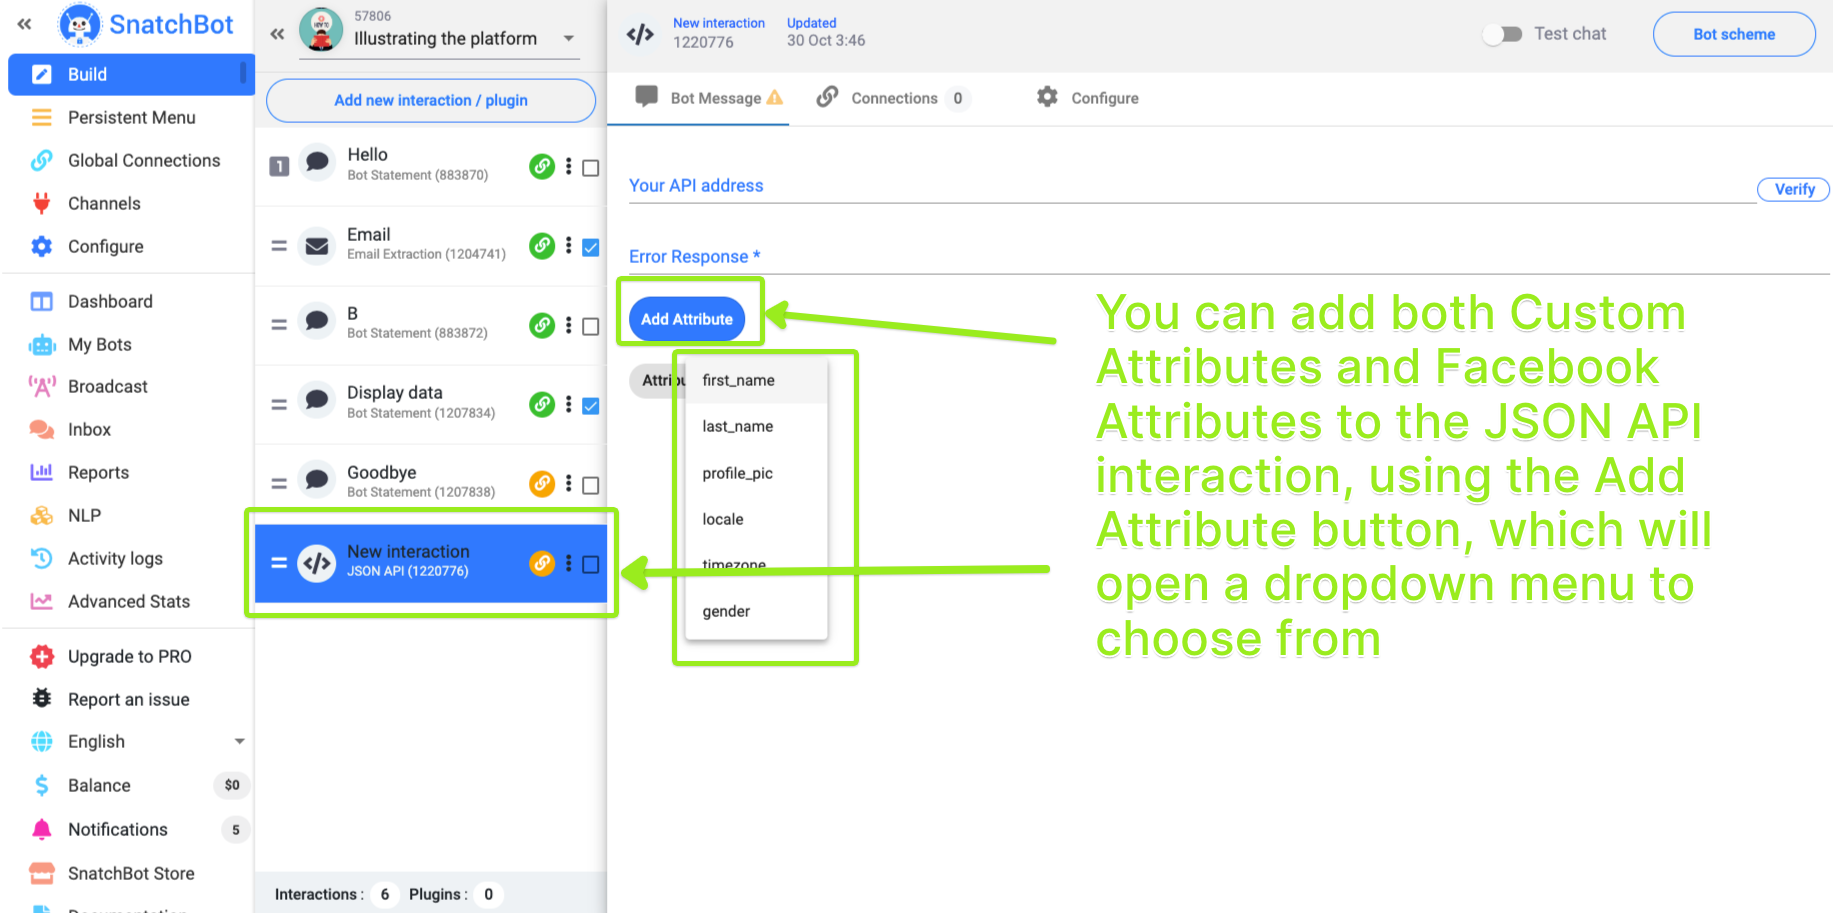
There is a dropdown menu to make it easy to add Attributes to the JSON API interaction.
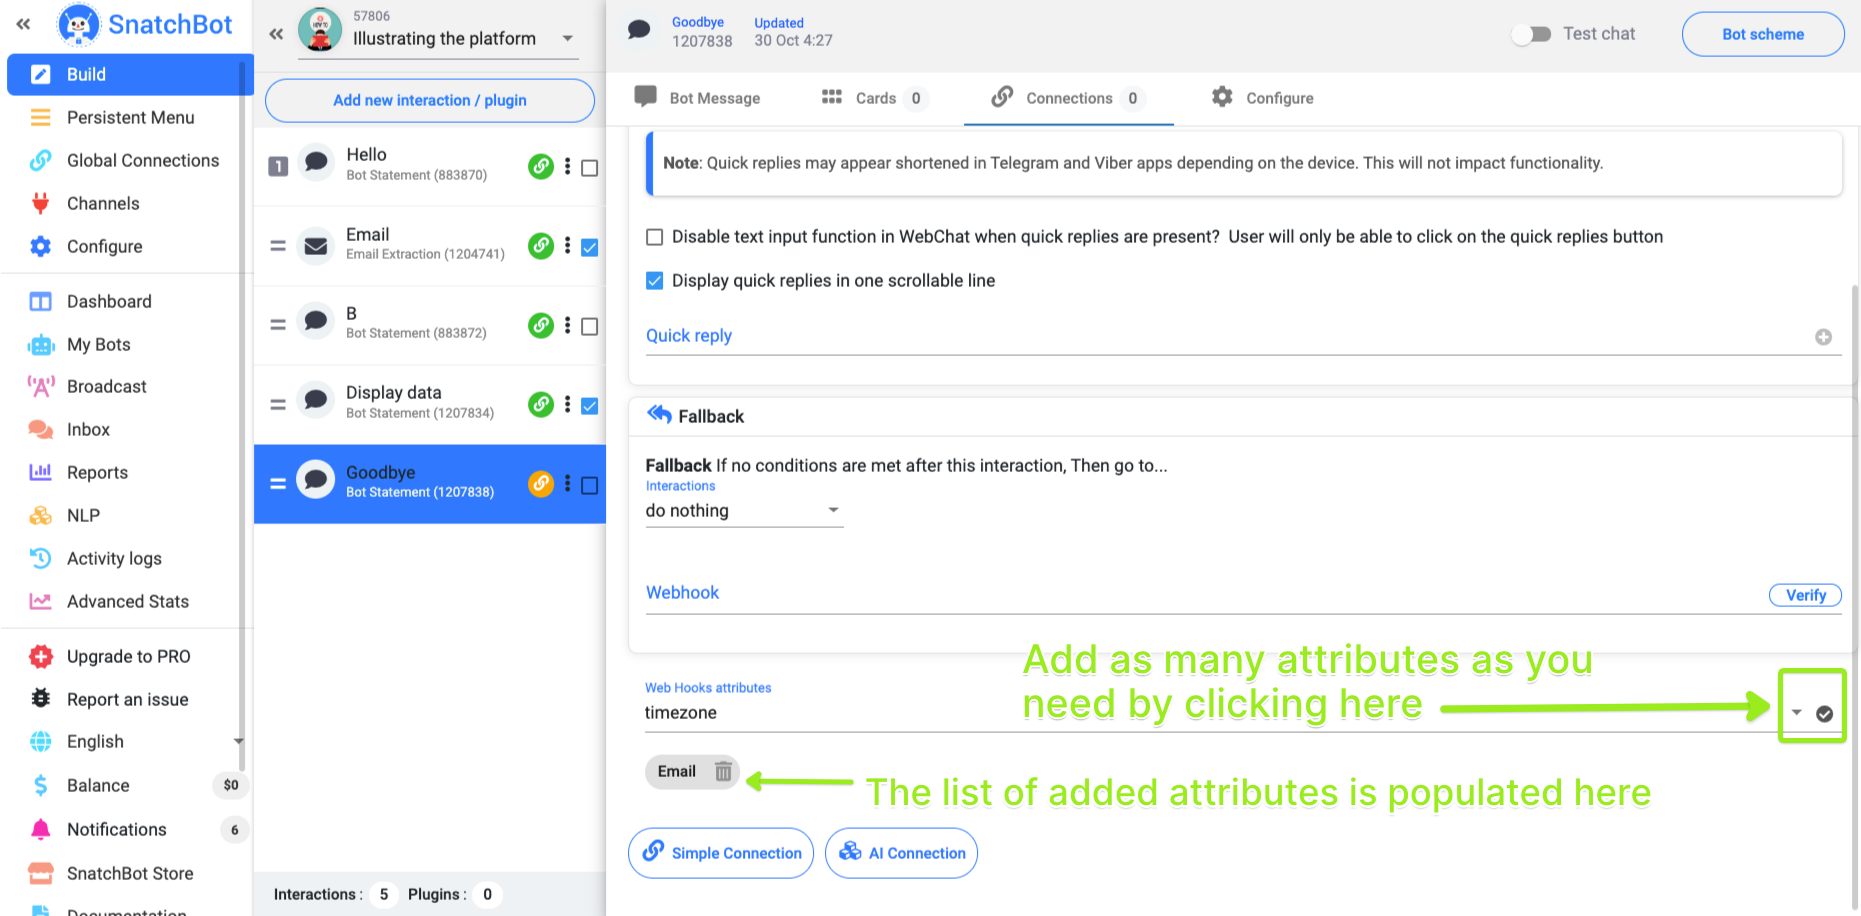
- Webhooks. Each webhook can receive as many attributes as you need per interaction. Choose the set of attributes that will be sent whenever an event (connection) is triggered via the Webhook option in the Configure menu of an interaction. Make sure to click the tick sign to add each attribute you need.
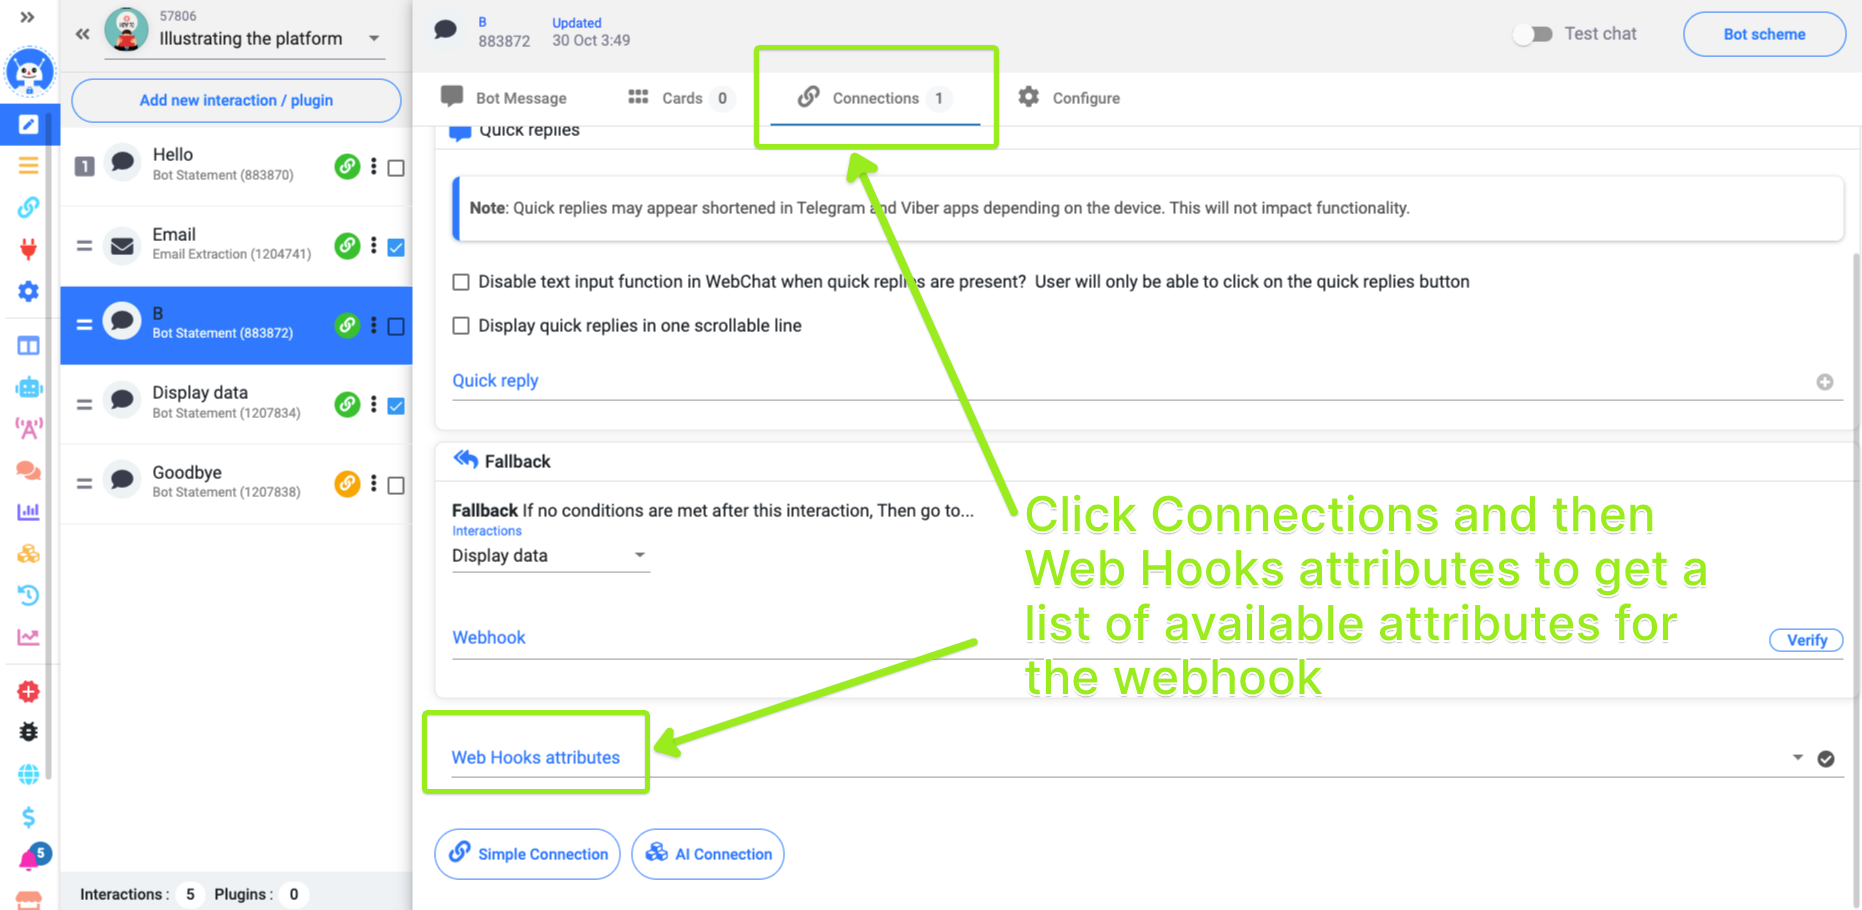
Webhooks can take the value of one interaction and export it to a URL
Broadcasts section
You can filter the list of broadcast recipients by using attributes. Just choose the attribute and the associated response (e.g. {{Gender}} and Female) from the drop-down menus. After hitting the Apply button, the resulting filtered list of recipients will be visible. This is a very powerful way of accurately targeting your messages
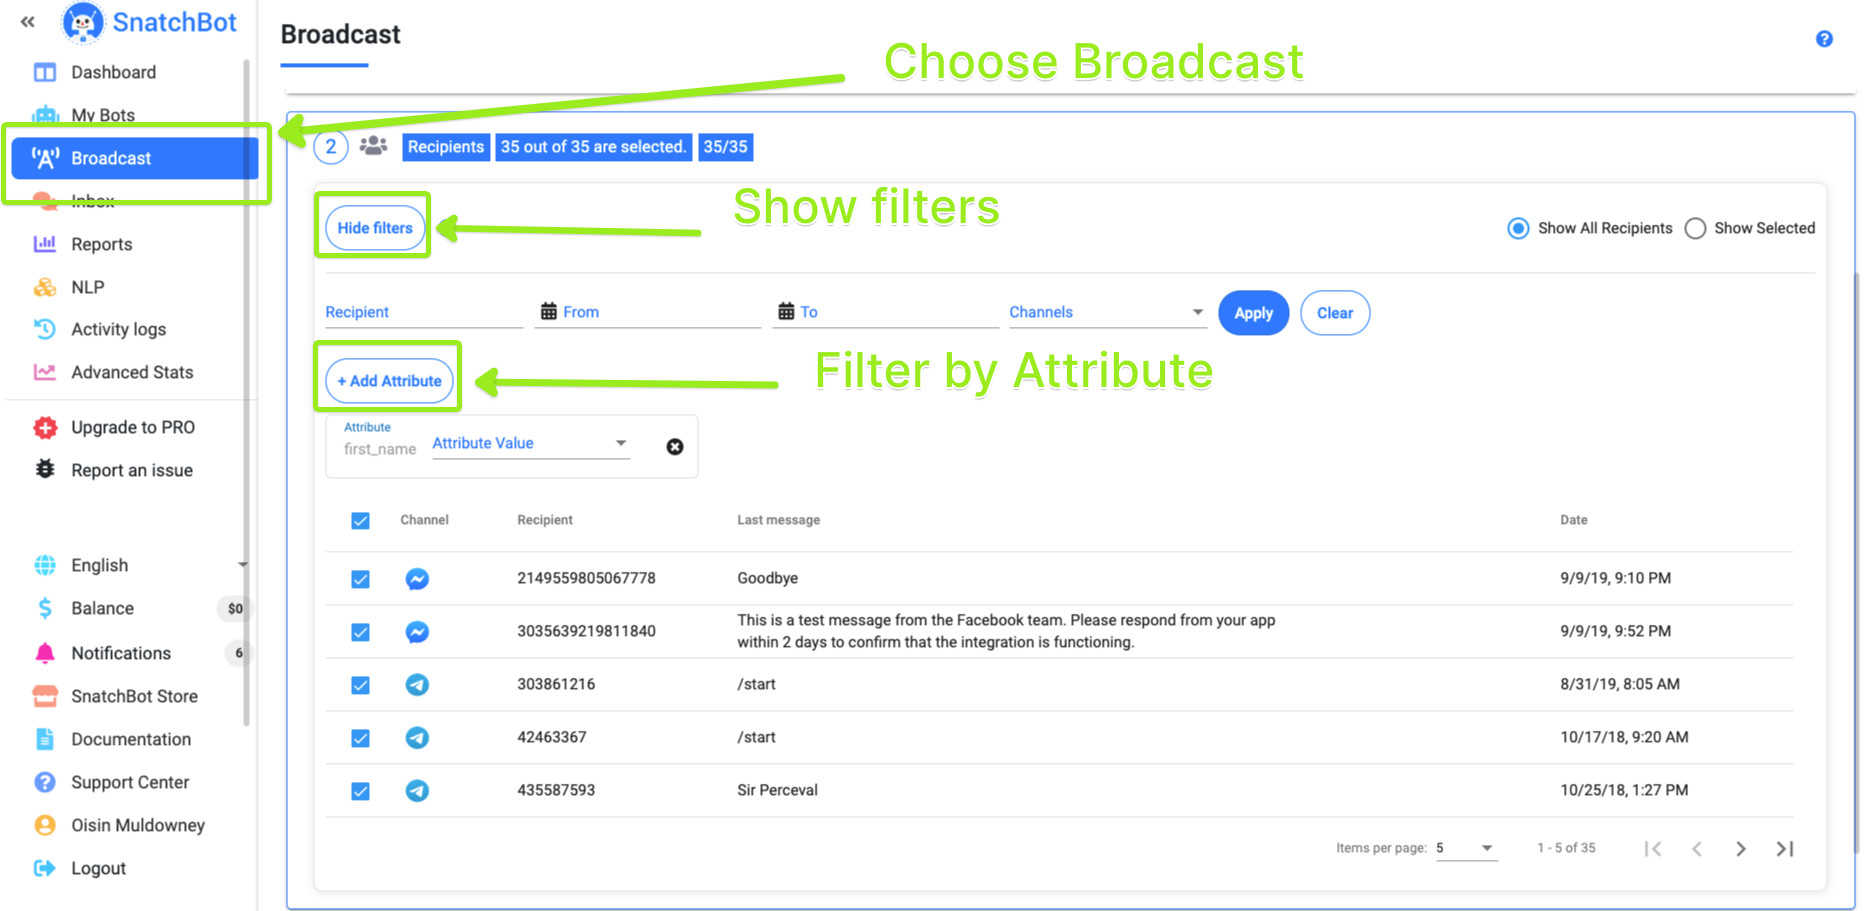
You can filter your Broadcast list by Attribute, allowing you to target your audience accurately.
You can use the system attributes available in every bot like {{first name}} or {{gender}}to greet users or to segment them in the user filter for broadcasting
Tip
For a template bot that shows you how to allow users to opt-in for broadcast messages click here.
Reports
Extraction types - All Attributes.
You can filter your reports by Attributes. These can be found in the Extracted data dropdown menu.
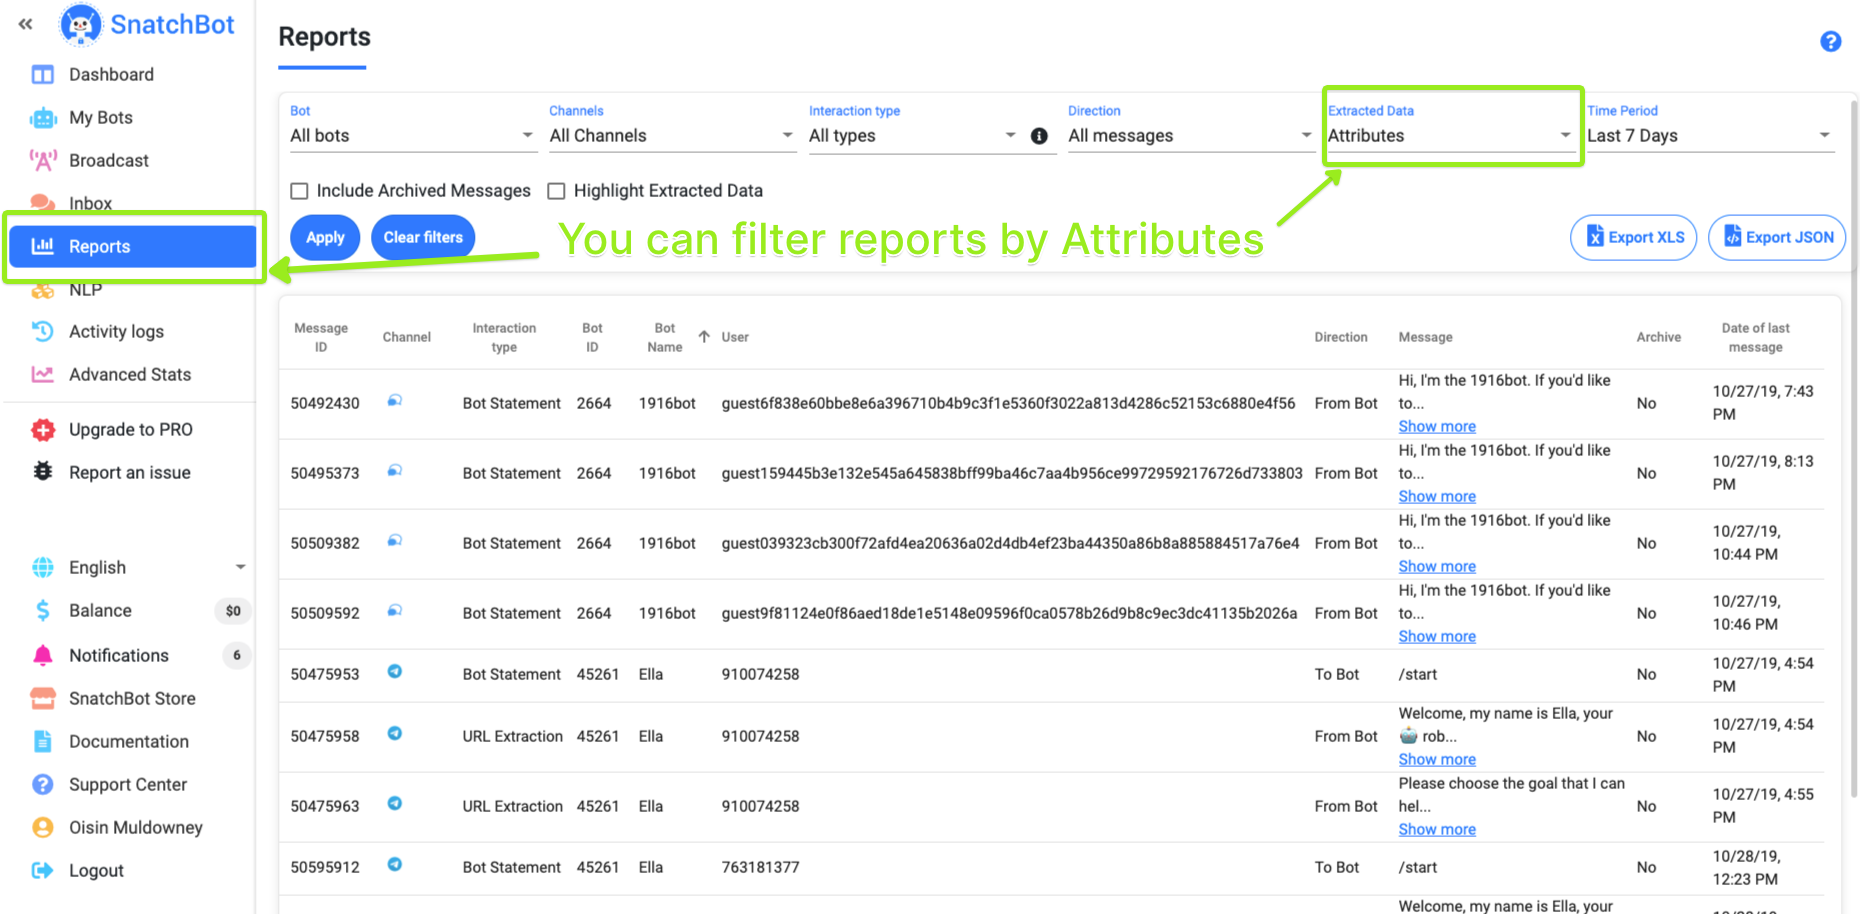
All the interactions where any attributes were set or received from Facebook are displayed in the report.
Watch this video tutorial ''How to deal with User Atributes on the SnatchBot platform''
Updated over 3 years ago
Putting custom user responses in a webhook
