Third-Party APIs - Integromat
How to Connect Your Chatbot With Third-Party APIs with the Help of Integromat
A very important functionality for your chatbots is giving them the ability to bring data from an API and post it in the chatbot’s responses, like supplying an RSS feed (which you can do easily thanks to our Plugin), but immensely more adaptable. You can do so using our JSON API interaction and building your own interface. Our goal at SnatchBot, however, is to simplify matters as much as possible and ensure that anyone can build sophisticated bots, with no coding background needed. So, we recommend using Integromat for this purpose. Integromat can also be used in the same way as Zapier, for exporting chatbot data to various apps.
Before creating our first Integromat scenario (similar to zaps on Zapier), you’ll need to open an account on this platform and choose between free and several paid plans. The free subscription is more than enough for initial testing. Unlike Zapier, Integromat allows you to create multi-step connections. Later when your chatbot business flourishes, you can easily upgrade your plan.
To explain this process, we have created a very small chatbot, called NASA APOD, which you can find in the Botstore. This chatbot has only two interactions, one of which is a JSON API, used for retrieving "A Photo of the Day" from NASA's public API and posting it to users.
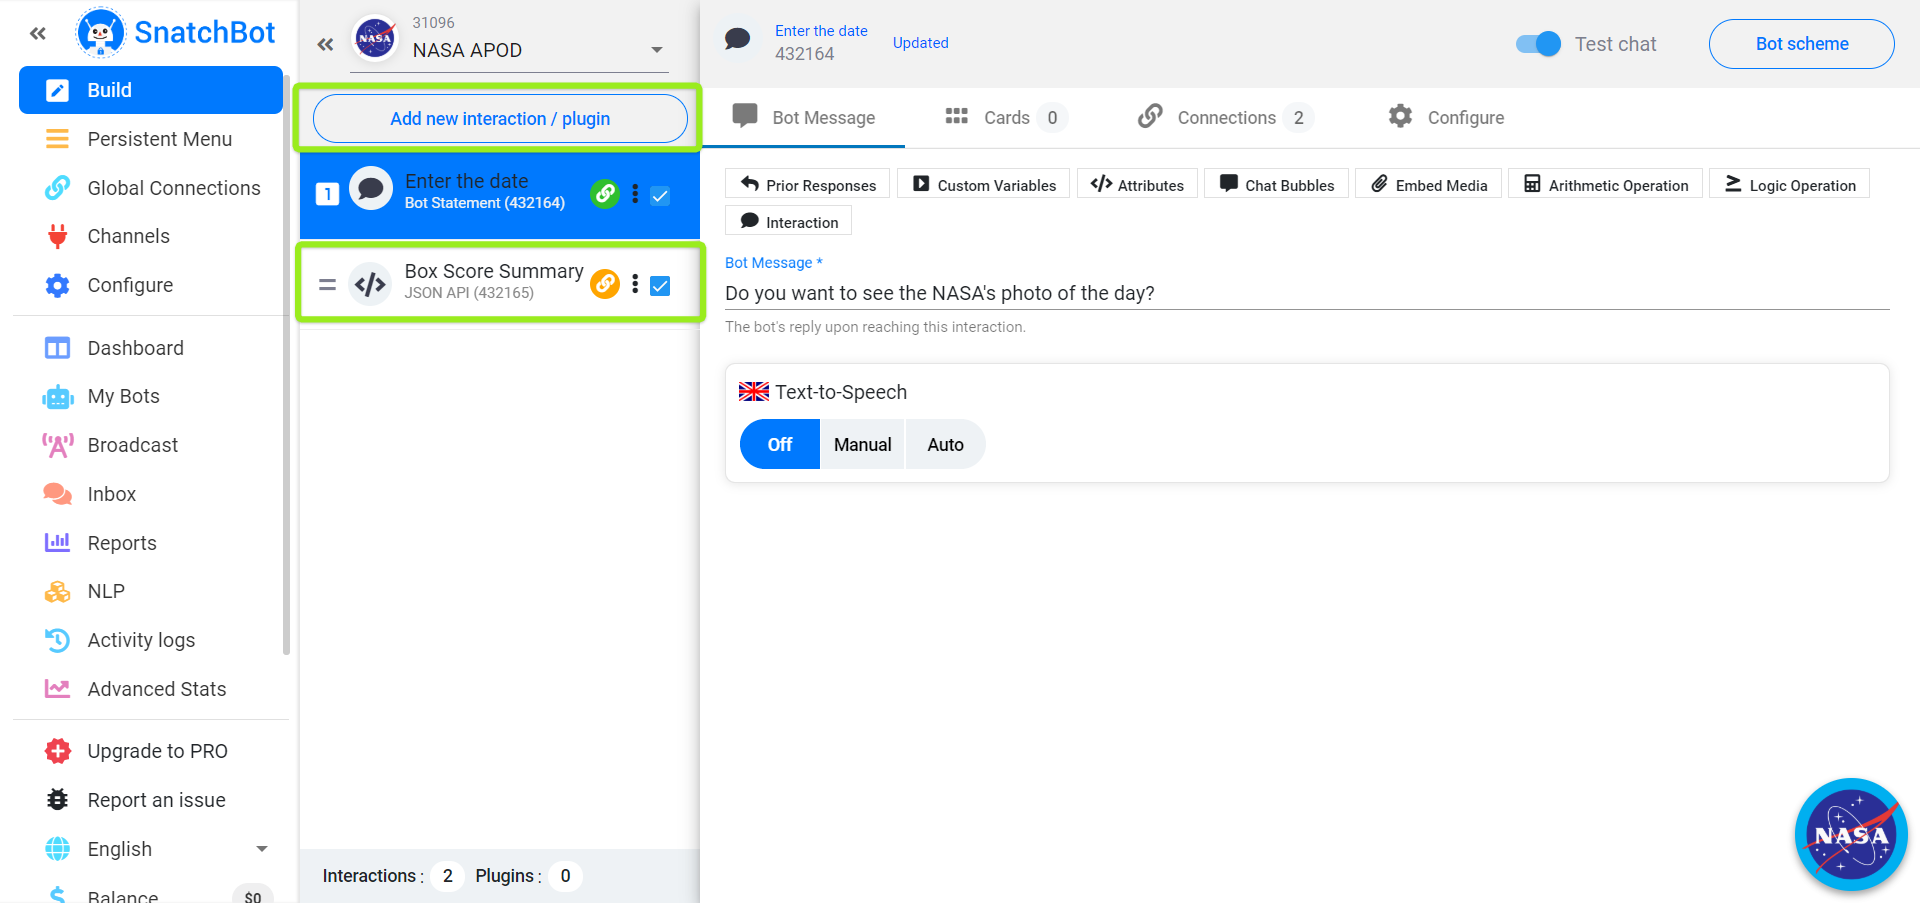
Receiving data from our chatbot
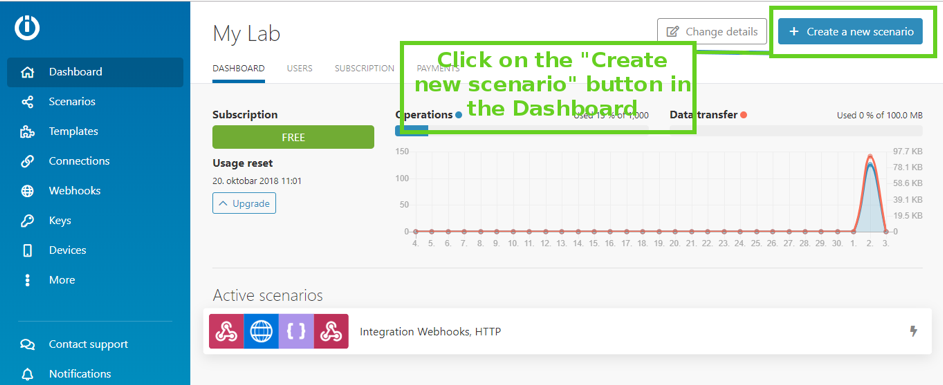
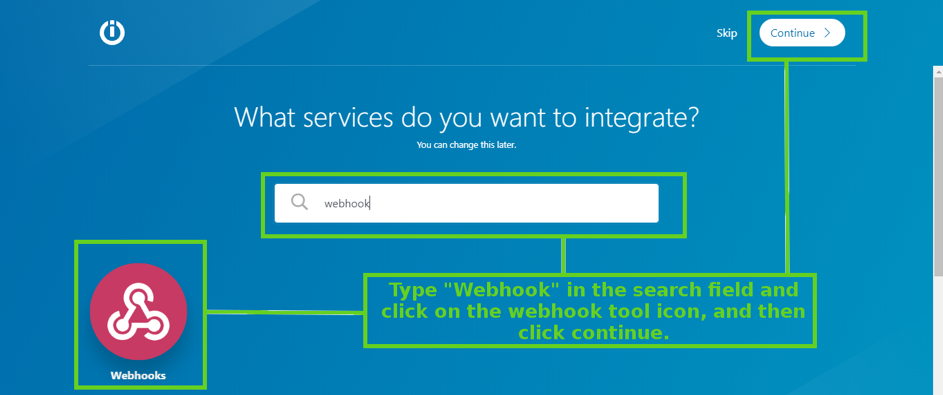
On your Integromat dashboard, click on the "+ Create a new scenario" button in the top right corner. It will open a scenario page where you can choose the module you want to start with (or skip that and go straight to the scheme page). For connecting your bot, you will want the Webhook module. So, just start typing "webhook" in the search field and click on the module after it shows up. After choosing the Webhook module, click on the "Continue" button in the top-right corner of the screen.
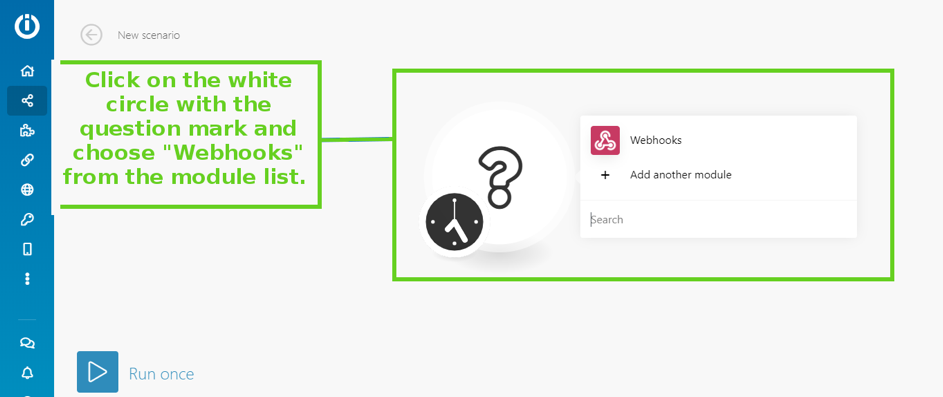
The scheme page will open in the next screen, and you can see a white circle with a question mark. When you click on it, the chosen Webhook module will show up in a popup.
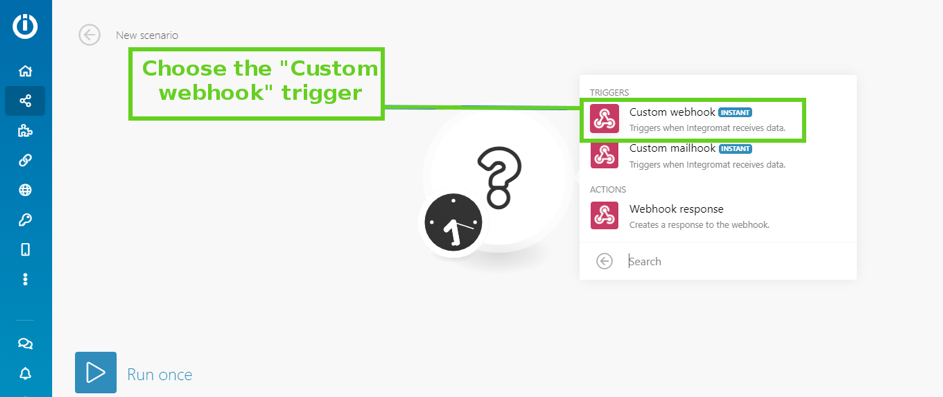
After clicking on the Webhook module, you will see the menu for triggers and actions. To receive the data from the chatbot, you need to choose the "Custom webhook” option.
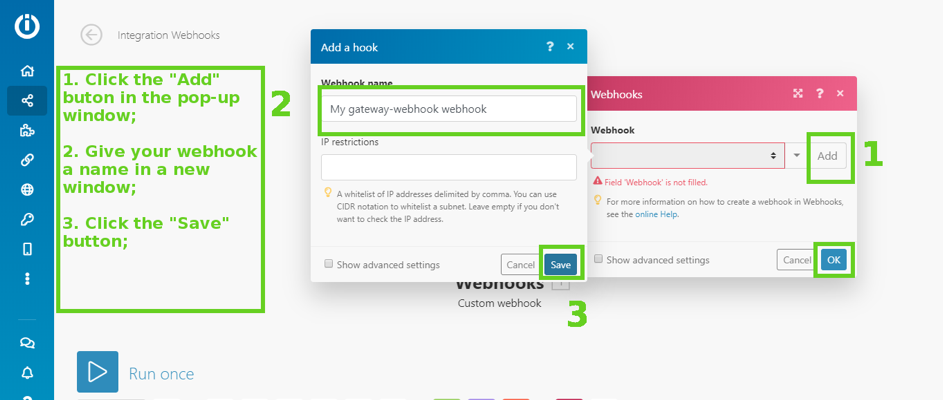
Integromat, unlike Zapier, requires you to give each webhook a name, since you can set this module to "listen" to several webhooks at once. First, click on the add button, then type the name of your webhook in the new window, or choose the default one. We can also set IP restrictions. In this case, the module will ignore calls sent from the IP addresses we type, which we don’t need in this scenario. Now, close the window and add the webhook by clicking the “Save” button.
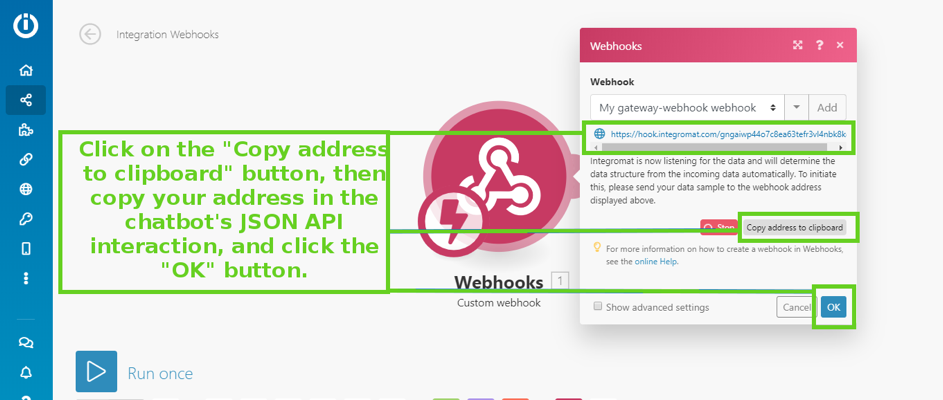
After adding the Webhook, you can see its assigned URL. You need to copy this URL by clicking on the "Copy address to clipboard" button.
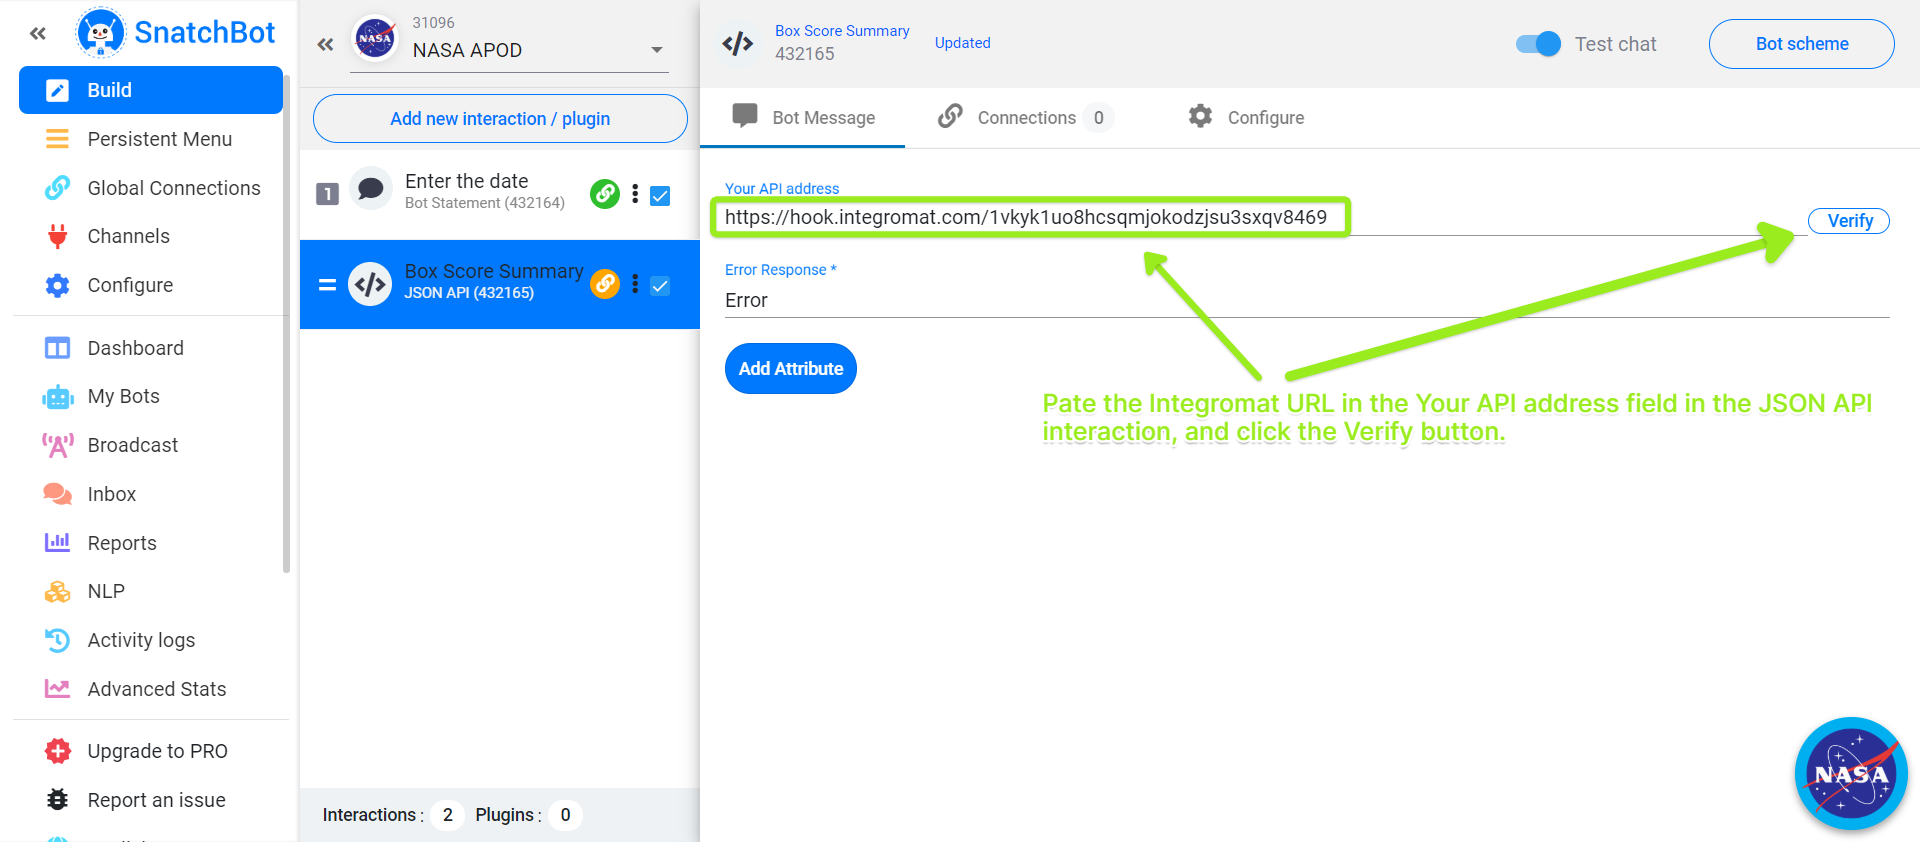
Now paste the copied URL to your SnatchBot chatbot’s JSON API interaction, in the "Your API address" field. Also add an error response while you are there. After pasting the Webhook URL, go back to the Integromat page, and click on the "OK" button.
Sending a GET request to the NASA APOD API and receiving their data
Your chatbot is set up to send a message to Integromat. Now you add another module to the scenario, by clicking the small circle on the right.
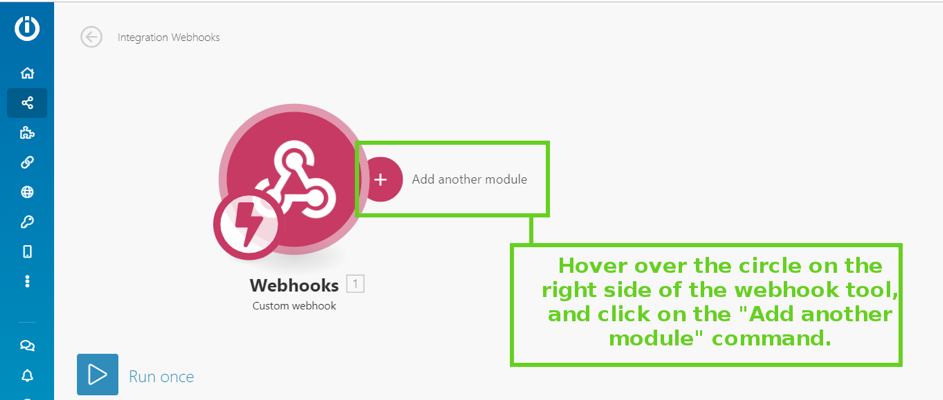
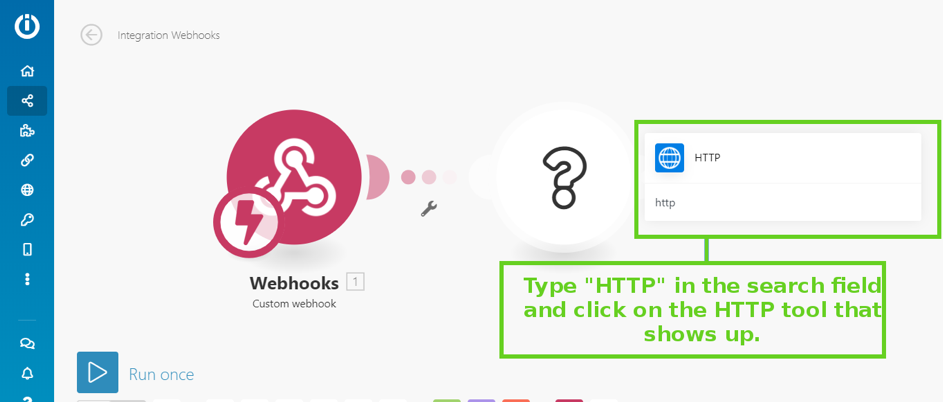
A new window with a search field will pop up, and you should type "HTTP," which is the name of the module we will use for sending HTTP requests. The module will show up (in a blue circle.
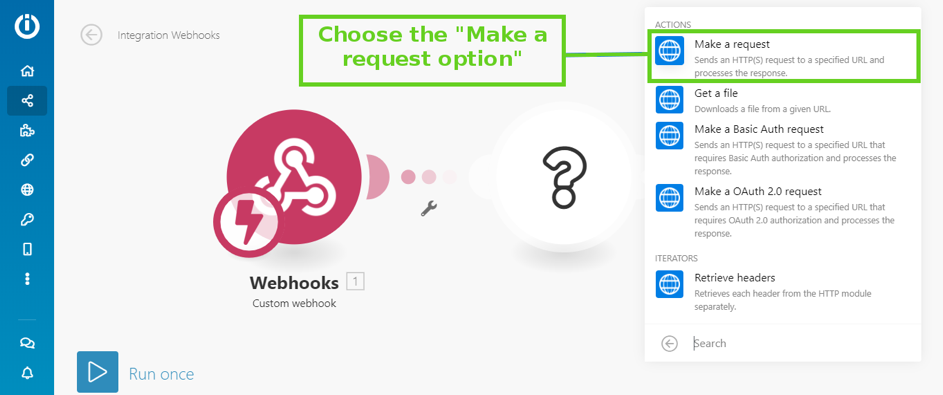
As with the Webhook module, you can see a menu of actions and triggers. You need to choose the "Make a request" option, to send the GET request to the NASA APOD API.
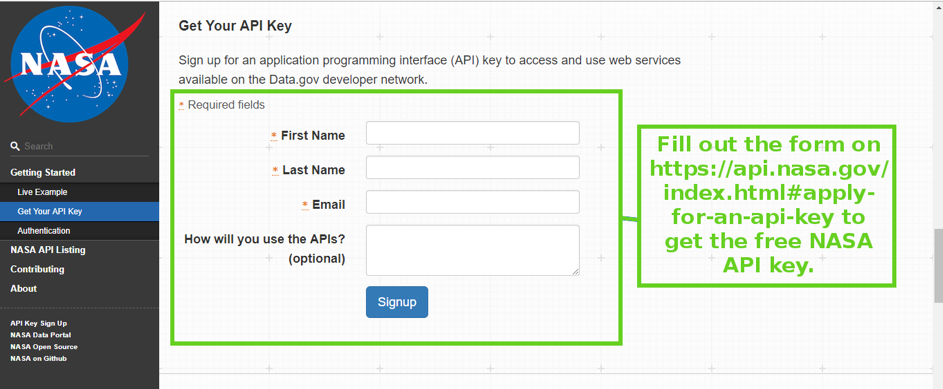
To send the request properly, you first need to sign up on the NASA’s website. Fill out a short form and retrieve the API key that will authorize your requests and allow your to receive their data. The key will show on your screen and it will also be sent to the email address you added.
In this and many other similar requests, you don't need to add parameters because all data can be added to the request URL. You need to paste your NASA API key as an authorization at the end of the URL, after the “?api_key” part, and paste all that to the URL field.
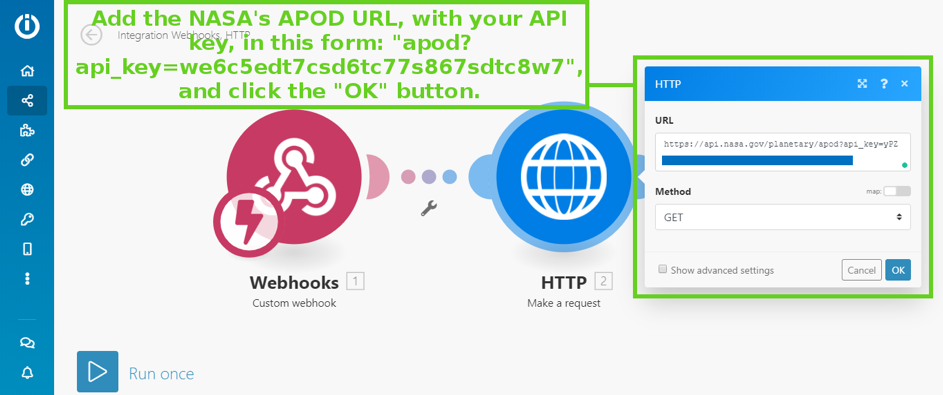
If you are making more complex bots and Integromat scenarios, you might need to insert some data from your Webhook (in the URL, or via parameters). To add parameters to the request, check the "Show advanced settings" field. When you click on any field in this request popup (URL, or parameters, strings, or headers in the advanced options) you will see another popup window with the selection of parameters received from the chatbot.
To add user inputs to your JSON API request on the chatbot, use attributes or variables.
Apart from this data, you can also add various pre-made functions or plain text.
Handling the data from NASA APOD API
The problem with the data retrieved from most APIs is that they are often received as one JSON string, which isn't a good structure for posting as plain text, text, image or gallery cards in the chatbot flow.
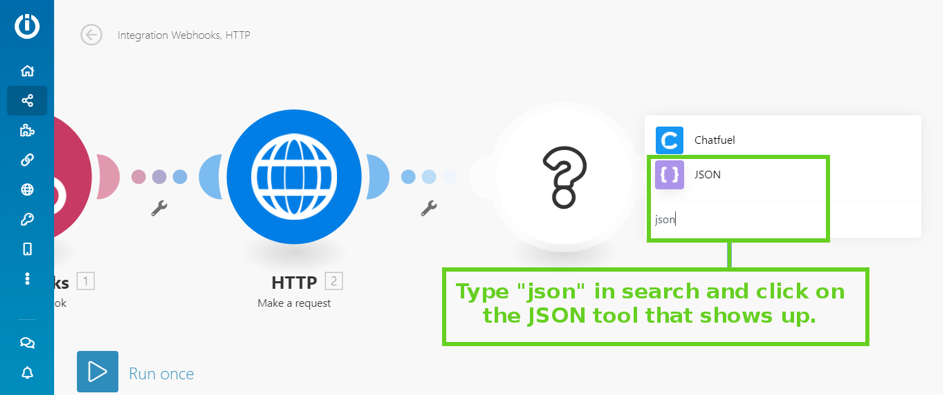
That is why you need to use another Integromat module that will parse the data sent by the NASA APOD API, and allow you to structure it in the right way. The module is called JSON. So, to add another connection, type "JSON" in the search field and click on the module after it shows up (in the purple square).
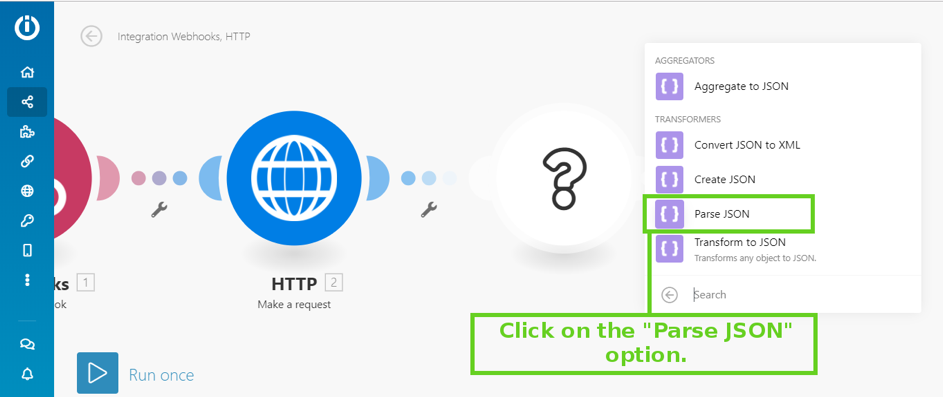
Then choose the “Parse JSON” option in the menu.
A new popup window will show up and allow you to add/name the data structure you want to parse. Then you should click on the JSON string field. In a new popup you will be able to select the data string for parsing. In this case: the string that contains the NASA's photo of the day; its explanation; date and copyright information is called "data." You should check each string just in case. You conclude here by clicking the "OK" button.

Sending the data back to the chatbot
Now connect another Webhook module and choose the “Webhook response" action, to respond to the chatbot request and share the NASA photo of the day with your users.
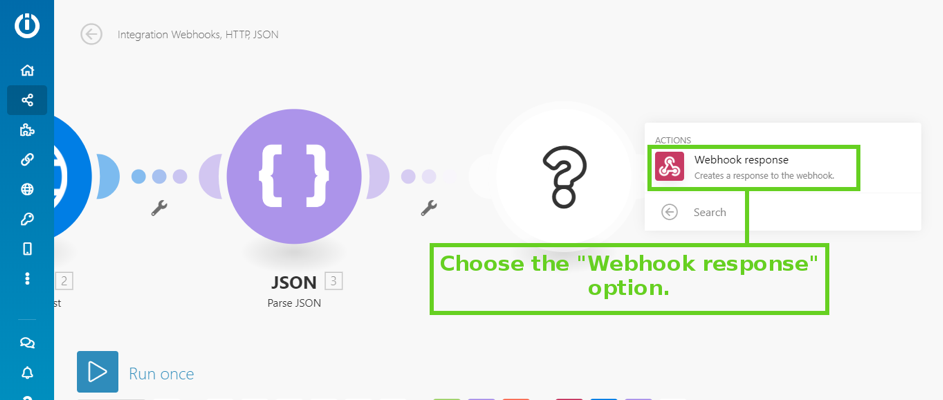
Enter 200 into the status bar and Save the scenario. The connection can work only if the number in the status bar is above 100.
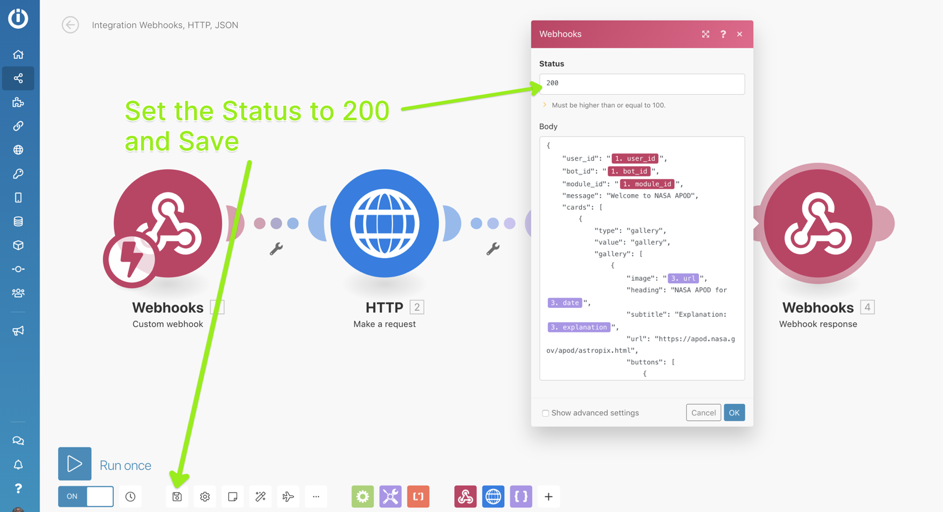
The most important part of the response form that will open is the “Body" field. You will need to add a JSON code that can be posted to the user, on the Snatchbot platform, in the form of plain text, text, image or gallery card. Don’t worry if you are unfamiliar with JSON, here is an example you can copy and paste, replacing the NASA-related messages and URLs with those of your API.
{
    "user_id": "{{1.user_id}}",
    "bot_id": "{{1.bot_id}}",
    "module_id": "{{1.module_id}}",
    "message": "Welcome to NASA APOD",
    "cards": [
        {
                   "type": "gallery",
                   "value": "gallery",
                   "gallery": [
                        {
                                "image": "{{3.url}}",
                                "heading": "NASA APOD for {{3.date}}",
                                "subtitle": "Explanation: {{3.explanation}}",
                                "url": "https://apod.nasa.gov/apod/astropix.html",
                                "buttons": [
                                        {
                                               "type": "url",
                                               "value": "https://apod.nasa.gov/apod/astropix.html",
                                               "name": "You can also view it here"
                                     }
                                  ]
          }
        ]
      }
   ]
}
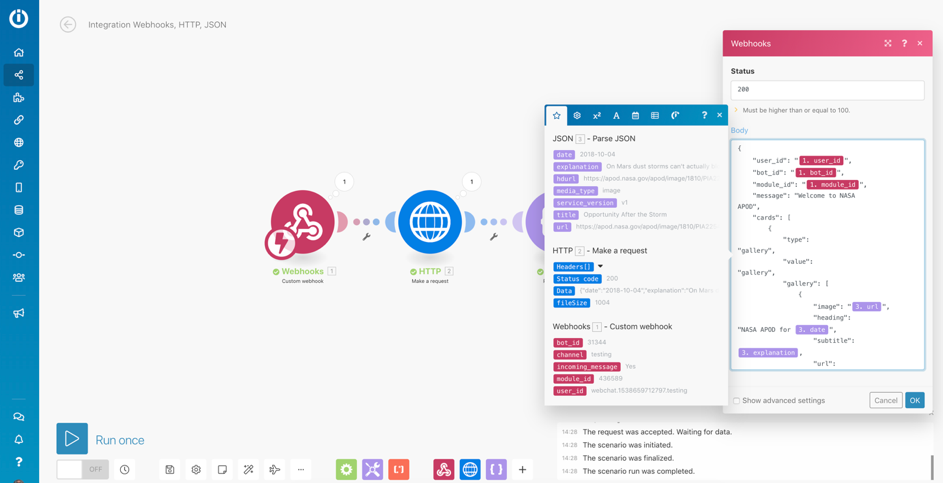
Next to the Body field, you can see a popup window that shows the parsed parameters in purple, red and blue under the JSON headline, as well as other parameters from the initial chatbot Webhook and the non-parsed NASA APOD API response. Click on these to use them to replace the highlighted text in red and purple.
If you want to add a button to the gallery card, you can copy the code and replace the URLs with the desired destination. In this case, we have added a button that leads to NASA APOD's home page.
Starting the scenario and testing your chatbot
After connecting all the modules, click the big blue play button to start the connection. If you have already run the bot while the scenario was off, Integromat will ask you to use the data that it previously received. Ignore this and turn on the scenario to obtain new webhooks.
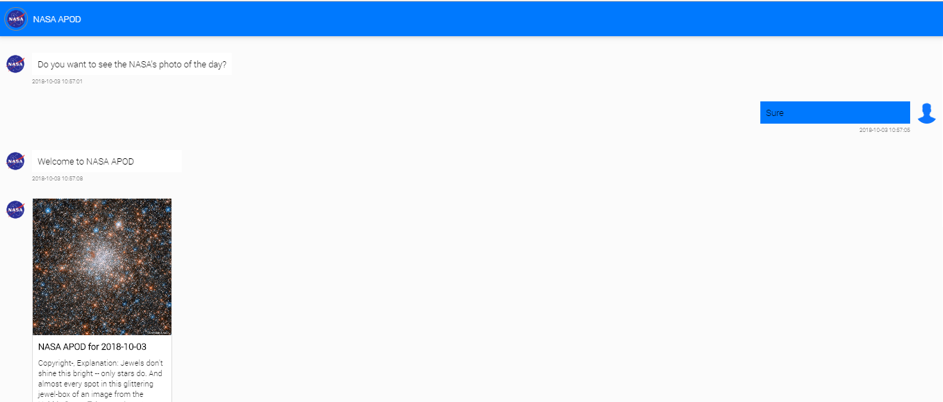
After that, go to your chatbot and run through the conversational flow. The data from the connected API should show on your screen. This is how the chatbot’s conversational flow now looks:
Finding bugs and other useful features
If you see an error message on the Integromat display, check the small balloons above each module. The one that has a red triangle with the exclamation mark is the one that caused the connection error. Click on the triangle and check the error, and ways to solve it.
Apart from this advanced bug check, Integromat also has plenty of other useful features. When it comes to exports and backups, it is very similar to Snatchbot, so you can export your scenario in the form of a JSON file, and use it on another account.
To do this, click the three dots icon in the lower stripe of feature icons, on your scenario screen, and choose the “Export Blueprint” option. To import the saved blueprint to another scenario or account, click on the “Import Blueprint” option.
Congratulations! You have just created a functional API connection with Integromat.
TIP
There are situations when all modules work correctly and yet the chatbot is still displaying an error message. This means that Integromat successfully processed and sent the information, but the chatbot wasn't able to show it to the user. This type of error might appear if you made mistakes in the JSON code in the last Webhook module. If you are adding a lot of elements to this field, you might forget to close one or a few pairs of brackets or quotation marks.
Also, sometimes the parser doesn’t recognize one or more parameters. In this case, you can add another JSON module and try to parse the missing parameter further, or just delete any parameter that wasn’t recognized from your JSON code.
Updated over 4 years ago
